Animating Characters
This "How To" goes over an end to end workflow from creating a character in Blender, adding animations to it with Mixamo and combining them into a single model, to controlling the movement of the animated character with the keyboard.
Detailed workflow
There are of course different tools and possible workflows to create an animated model that can be used in a Babylon.js project. Below is the detailed workflow of this How To:
- Use Blender to create the model
- Export the model as .FBX
- Load the model in Mixamo to rig it and add animations
- Download animated models as .FBX files
- Use Blender to combine the animated models into one
- Export as .GLB (animation as Animation Group)
- Load the .GLB in a Babylon.js Playground and control the model movement via keyboard
Create a character with animation
The first step is to create a character (a low poly character in this example). It usually involves starting from the 2D drawing of a character and then model it in 3D from head to toes. This is a quite long but fun experience. Blender can be used to model a low poly character such as in Grant Abbitt's Low-Poly anime girl tutorial:
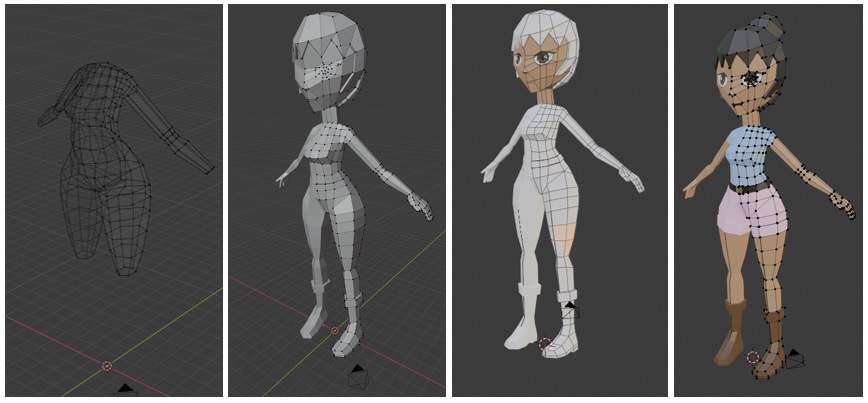
Once done with the creation of the model, the next step is to bring it to life by adding animations. The easy way to animate a character is with Mixamo. Grant Abbit goes over it in details in this video.
It involves going through the following:
- In Blender, export the model as an .FBX file and upload it on Mixamo
- In Mixamo, start with auto-rigging the model: after mapping key points of the model (e.g. chin, wrist, elbows etc… ), a rigging algorithm creates the skeleton onto which the animations will be applied
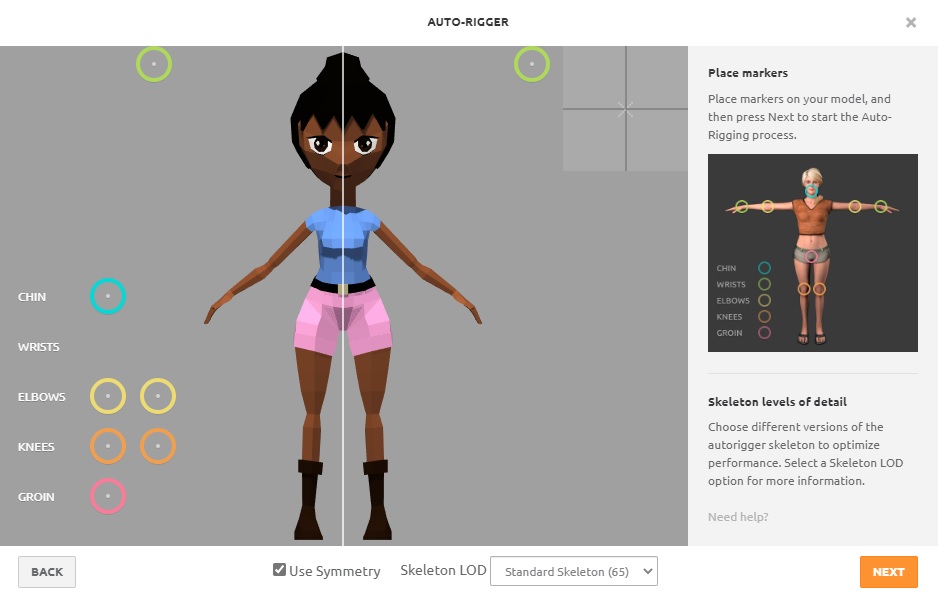
- Then pick an animation, "Walk" for instance, and download the result as a .FBX file

Add and combine several animations into a character
As several animations are needed for a character (e.g. Idle, Walk, Walk backwards, etc…), the previous step of exporting an animation into a FBX file must be done for each animation (animation packs, such as "Basic Locomotion Pack", are available but they are just a zip with many .FBX files).
The key step to finish the character is to combine the animations, each contained in a .FBX file, into a unique model with several animations. Ben Rigby has a very simple tutorial for it here:
It involves importing all the FBX files into an empty Blender project making sure to rename the loaded animations, displaying the Non-linear Animation tool, deleting the duplicate objects and adding an actions strip for each animation.
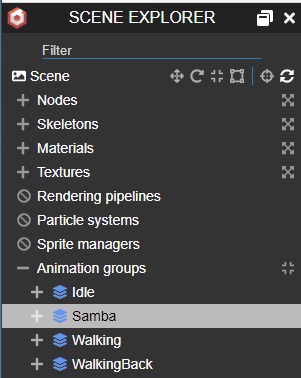
The result is exported as a .GLB file and the animation information can be seen by drag and dropping the file in the Sandbox as Animation Groups (the .GLB file example is available here).

Control the movement of the animated character with the keyboard
Import the model and play animation
The model can be loaded using the ImportMesh method of the SceneLoader class and making sure to add the animationGroups parameter as it is used to get and play the animations.
BABYLON.SceneLoader.ImportMesh("", "https://assets.babylonjs.com/meshes/", "HVGirl.glb", scene, function (newMeshes, particleSystems, skeletons, animationGroups) {    var hero = newMeshes[0];
    //Scale the model down            hero.scaling.scaleInPlace(0.1);
    //Lock camera on the character     camera1.target = hero;
    //Get the Samba animation Group    const sambaAnim = scene.getAnimationGroupByName("Samba");
    //Play the Samba animation      sambaAnim.start(true, 1.0, sambaAnim.from, sambaAnim.to, false);
});The names of the AnimationGroups can be found in the Sandbox via the Inspector, by loading the model and selecting the Animation Group in the Scene Explorer.
By default the animationGroups[0] is played when loading a model with an animation Group. To stop it:
animationGroups[0].stop();Control animations via keyboard
The Action Manager can be used to capture the keys pressed on the keyboard:
var inputMap = {};scene.actionManager = new BABYLON.ActionManager(scene);scene.actionManager.registerAction(new BABYLON.ExecuteCodeAction(BABYLON.ActionManager.OnKeyDownTrigger, function (evt) { inputMap[evt.sourceEvent.key] = evt.sourceEvent.type == "keydown";}));scene.actionManager.registerAction(new BABYLON.ExecuteCodeAction(BABYLON.ActionManager.OnKeyUpTrigger, function (evt) { inputMap[evt.sourceEvent.key] = evt.sourceEvent.type == "keydown";}));Then in the rendering loop, which is executed every frame, the position and direction of the hero character are updated:
if (inputMap["w"]) { hero.moveWithCollisions(hero.forward.scaleInPlace(heroSpeed)); keydown = true;}if (inputMap["s"]) { hero.moveWithCollisions(hero.forward.scaleInPlace(-heroSpeedBackwards)); keydown = true;}if (inputMap["a"]) { hero.rotate(BABYLON.Vector3.Up(), -heroRotationSpeed); keydown = true;}if (inputMap["d"]) { hero.rotate(BABYLON.Vector3.Up(), heroRotationSpeed); keydown = true;}if (inputMap["b"]) { keydown = true;}And also the relevant animation are played:
if (keydown) { if (!animating) { animating = true; if (inputMap["s"]) { //Walk backwards walkBackAnim.start(true, 1.0, walkBackAnim.from, walkBackAnim.to, false); } else if (inputMap["b"]) { //Samba! sambaAnim.start(true, 1.0, sambaAnim.from, sambaAnim.to, false); } else { //Walk walkAnim.start(true, 1.0, walkAnim.from, walkAnim.to, false); } }}This simple example can be enhanced:
- By adding a more robust logic to manage the details of selecting multiple keys and combining them
- By using the Device Source Manager instead of the Action Manager for key presses
- With animation blending to ensure much more natural transitions between animations