Mesh Picking
Raycasts
The rays are like sunrays. They are used to check collisions or intersections in the scene between meshes and points.
In the previous tutorial, we used it to select meshes with the mouse (a ray goes from camera to mouse position in 3D),
using the function scene.pick(scene.pointerX, scene.pointerY).
But here we will see that we can throw ray from any point and in any direction. For example in a shooting game at 3rd person view: collisions between our bullets and obstacles.
Documentation of classes :
You must first create a ray.
The method scene.pickWithRay() throws a ray in your scene to pick a mesh.
Use the picking info that is returned by scene.pickWithRay().
Detect the first mesh touched by the ray
Check out an example here: Get First Mesh Hit By Ray
(The following descriptions will reference this example. All line references are from the most recent example link)
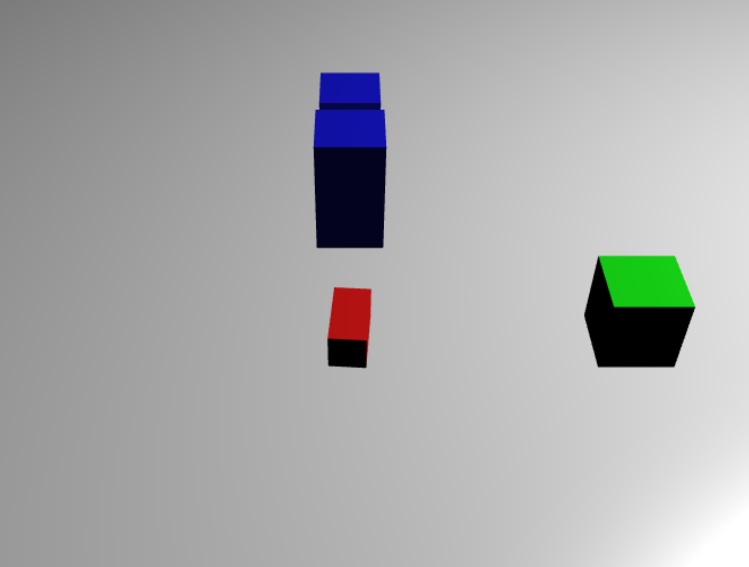
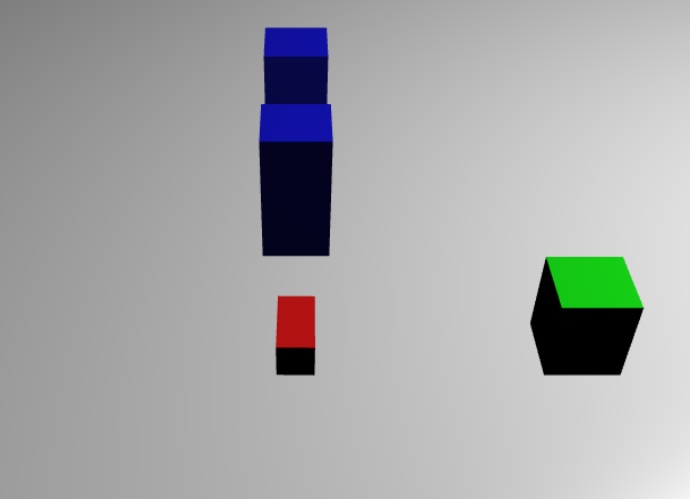
In all our playgrounds, we will imagine that our character is the main box at the center. It will shoot laser beams continually forward and detect which enemy (other boxes) is hit.
So with the mouse, you don't need to click but move to turn the box with this trigonometry function mousemovef (line #34).
A ray requires when its created: an origin, a direction and a length.
First, we set box.isPickable to false to avoid the ray touching the box from the inside (line #16).
Because we set the starting point (origin) of the ray in the center of the box.
The most important part is to get the good directional vector (line #57):
var forward = new BABYLON.Vector3(0, 0, 1);forward = vecToLocal(forward, box);
var direction = forward.subtract(origin);direction = BABYLON.Vector3.Normalize(direction);
We want the forward vector relative to the box space and orientation.
Then, to get the direction, we subtract it from the origin, the box position.
The function vecToLocal is designed to transform a position from a mesh point of view by multiplicating a vector by the mesh matrix.
Then, we create the ray with all elements given and a length of 100 for example (line #65):
var ray = new BABYLON.Ray(origin, direction, length);Finally, we get the hit point of the ray if it touches a mesh (line #68):
var hit = scene.pickWithRay(ray);And if a mesh is hit, we do what we want with the picking info like getting the mesh name, the position of the point etc... Here we change its size because it's funnier!
You're not forced to set box.isPickable to false, if you need later to check rays intersection on this box for example.
You can set the origin point of the vector in front of the box, the direction a little further and the length that you want (line #55):
Predicate function
It is a filter to choose which meshes will be selectable:
Predicate Function Example
We added a new function predicate (line #54):
function predicate(mesh) { if (mesh == box2 || mesh == box) { return false; } return true;}and in parameter here:
scene.pickWithRay(ray, predicate);The isPickable false argument becomes irrelevant so we have to avoid box. We avoid also box2 for testing and allow the rest (box3 and box4 by default).
And the result is, only box3, the second blue one behind, and box4 will grow. So it works fine like if box2 was transparent for the ray!
There is one other optional argument to the method pickWithRay. It's the boolean fastCheck (false by default).
True will return the first mesh that intersects with the ray (in the order of the meshes array), not the closest mesh to the ray's starting point.
Triangle predicate
Starting with Babylon.js v4.0 you can define a custom predicate to filter the triangles selected to be tested against the incoming ray. The predicate will be called with the 3 vertices of each face and the upcoming ray:
scene.pick(scene.pointerX, scene.pointerY, null, false, null, (p0, p1, p2, ray) => { var p0p1 = p0.subtract(p1); var p2p1 = p2.subtract(p1); var normal = BABYLON.Vector3.Cross(p0p1, p2p1); return BABYLON.Vector3.Dot(ray.direction, normal) < 0;});In this example we are filtering out all the triangles that are not facing towards the camera.
Live example: Triangle Predicate
Multi pick
We can use scene.multiPickWithRay if we don't want that the ray to stop at the first obstacle:
The picking result will be an array (line #68).
We can loop through the array to change all meshes hit. In the example you can see that the two blue boxes change in size. It's like a strong bullet!
An other method is to use directly the Ray class.
To change the ray to a local space :
Ray.Transform(ray, matrix) → RayChecking intersection:
Ray.intersectsMesh(mesh, fastCheck) → PickingInfoPicking Ray
Another handy feature is the createPickingRay. This special ray is cast from a camera, out to infinity, in the direction of the cursor (relative to the virtual lens). Confusing? Basically think of it as a ray that's cast out of the camera and 'aimed' by the cursor. This is another method for picking objects in your scene. Here's a playground and video to check out on the subject.
Picking Ray ExampleAn other method is to use directly the Ray class.
To change the ray to a local space :
Ray.Transform(ray, matrix) → RayChecking intersection:
Ray.intersectsMesh(mesh, fastCheck) → PickingInfoDebugging
It could be tough to understand where a ray starts and is its direction. To help you debug you can then use the RayHelper.
You can either use a static function to create and show one:
BABYLON.RayHelper.CreateAndShow(ray, scene, new BABYLON.Color3(1, 1, 0.1));or you can use a more detailled version:
var rayHelper = new BABYLON.RayHelper(ray);rayHelper.show(scene);The helper can also be attached to a mesh to track its direction:
var localMeshDirection = new BABYLON.Vector3(0, 0, -1);var localMeshOrigin = new BABYLON.Vector3(0, 0, -0.4);var length = 3;rayHelper.attachToMesh(box, localMeshDirection, localMeshOrigin, length);