How to export 3DS MAX scene as glTF
If you have not already installed the babylon plugin for 3DS MAX, you can find all instructions here as well as general information about the plugin.
With this plugin, you can also export your project to glTF 2.0 format (https://github.com/KhronosGroup/glTF/).
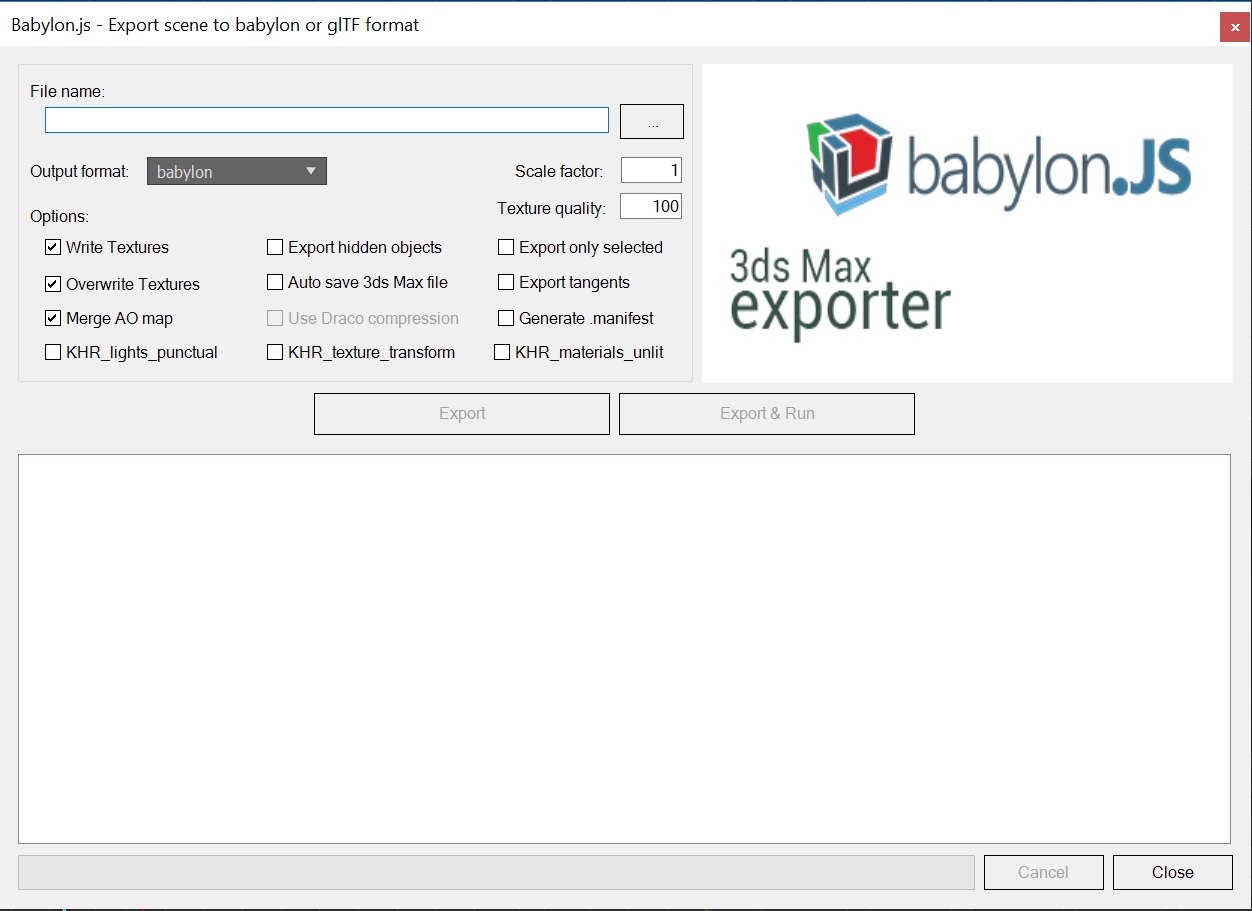
All you need to do is choose gltf as Output format.
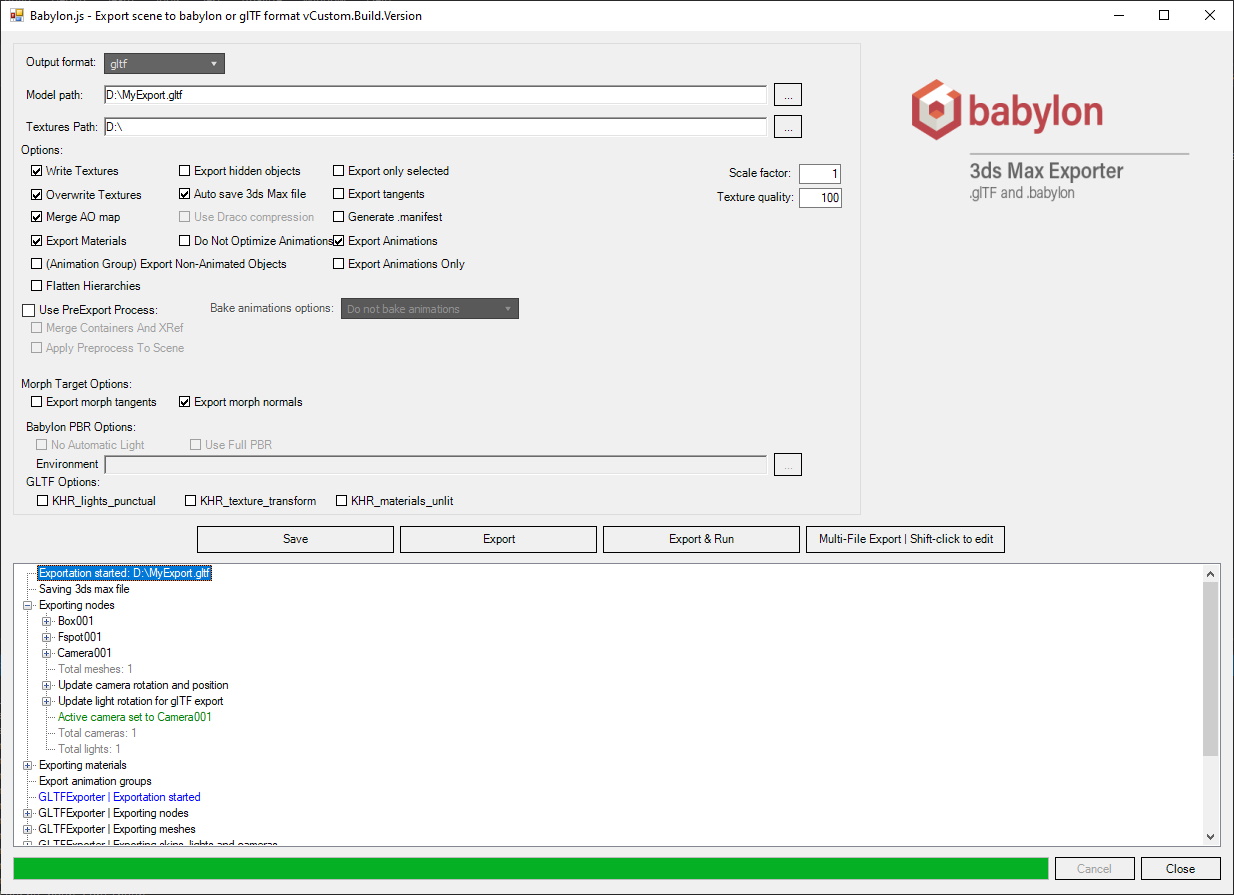
The plugin exports to babylon format before converting it to glTF. The notable exported files are the .gltf and .bin ones.
To export to a single .glb file, choose glb as Output format.
Features
Exported features
Since the plugin first exports to babylon then converts it to glTF, glTF features are a subset of the babylon ones.
-
Cameras
- zfar
- znear
- yfov (Perspective camera)
- Position / rotation (from nodes)
-
Meshes
- Geometry: position, normal, color, texture coordinates (2 channels)
- Position / rotation / scaling (from nodes)
- Skin
- Instances
- Morph targets
- Animations: bones, morph weights
-
Nodes
- Hierarchy
- Position / rotation / scaling
- Animations: position, rotation, scaling
- Custom attributes
-
Materials
- Standard material (converted to PBR, see below)
- Physical material (PBR)
- Standard Surface Arnold material
- Base color and alpha
- Metalness and roughness
- Emission, ambient occlusion
- Bump mapping
- Multi-materials
- Double-sided materials
- Unlit
- Backface culling
- Opacity/Transparency mode
- Custom attributes
- RGB Multiply map
-
Textures
- Wrap mode (Clamp, mirror, repeat)
- magFilter, minFilter
- Image format conversion to jpg / png
- Texture transform
-
Animations
- Export without animations
- Export animations only
Conversion Standard to PBR materials
3DS MAX Standard materials are converted to PBR materials based on their diffuse, specular, opacity and glossiness.
The complete algorithm is detailed here
Note that the conversion duration scales with images size and may have a severe impact on export duration.
PBR materials
The physical materials are exported to glTF format as PBR materials.
Involved parameters are highlighted bellow and described in the following sections.
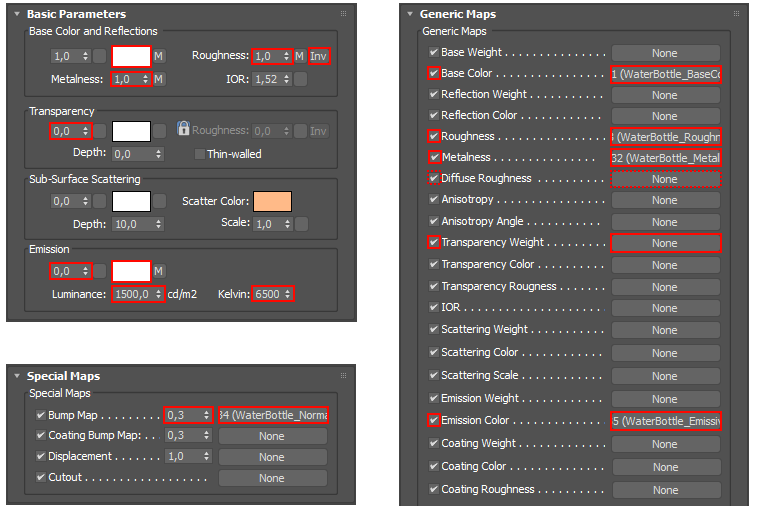
Remember that in 3DS MAX, when a map is assigned to a parameter, the basic parameter value is ignored. This behaviour is kept when exporting.
Base color and Transparency
Only the color of base color is used. The weight of base color is ignored.
Only the weight of transparency is used. The color of the transparency is ignored, as well as other parameters (depth, thin-walled, transparency roughness).
In glTF format, the transparency is expressed in alpha (alpha = 1 - transparency).
The base color RGB and the alpha A are merged together into a single color RGBA:
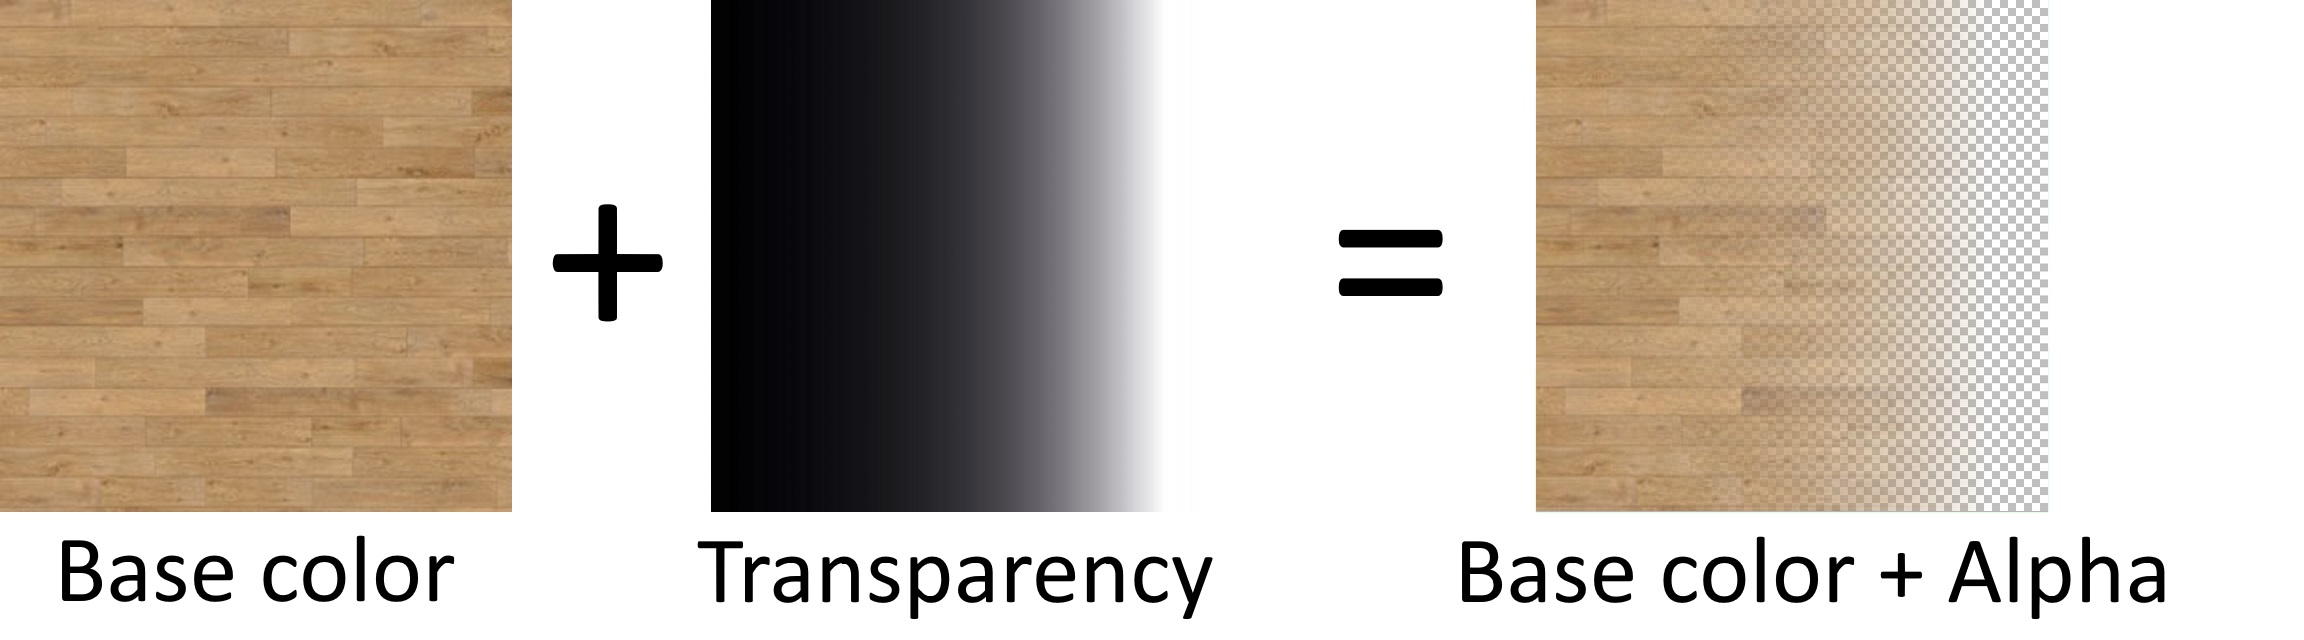
The 2 maps must have same sizes to be merged successfully.
Note that the duration of this process scales with images size and may have a severe impact on export duration.
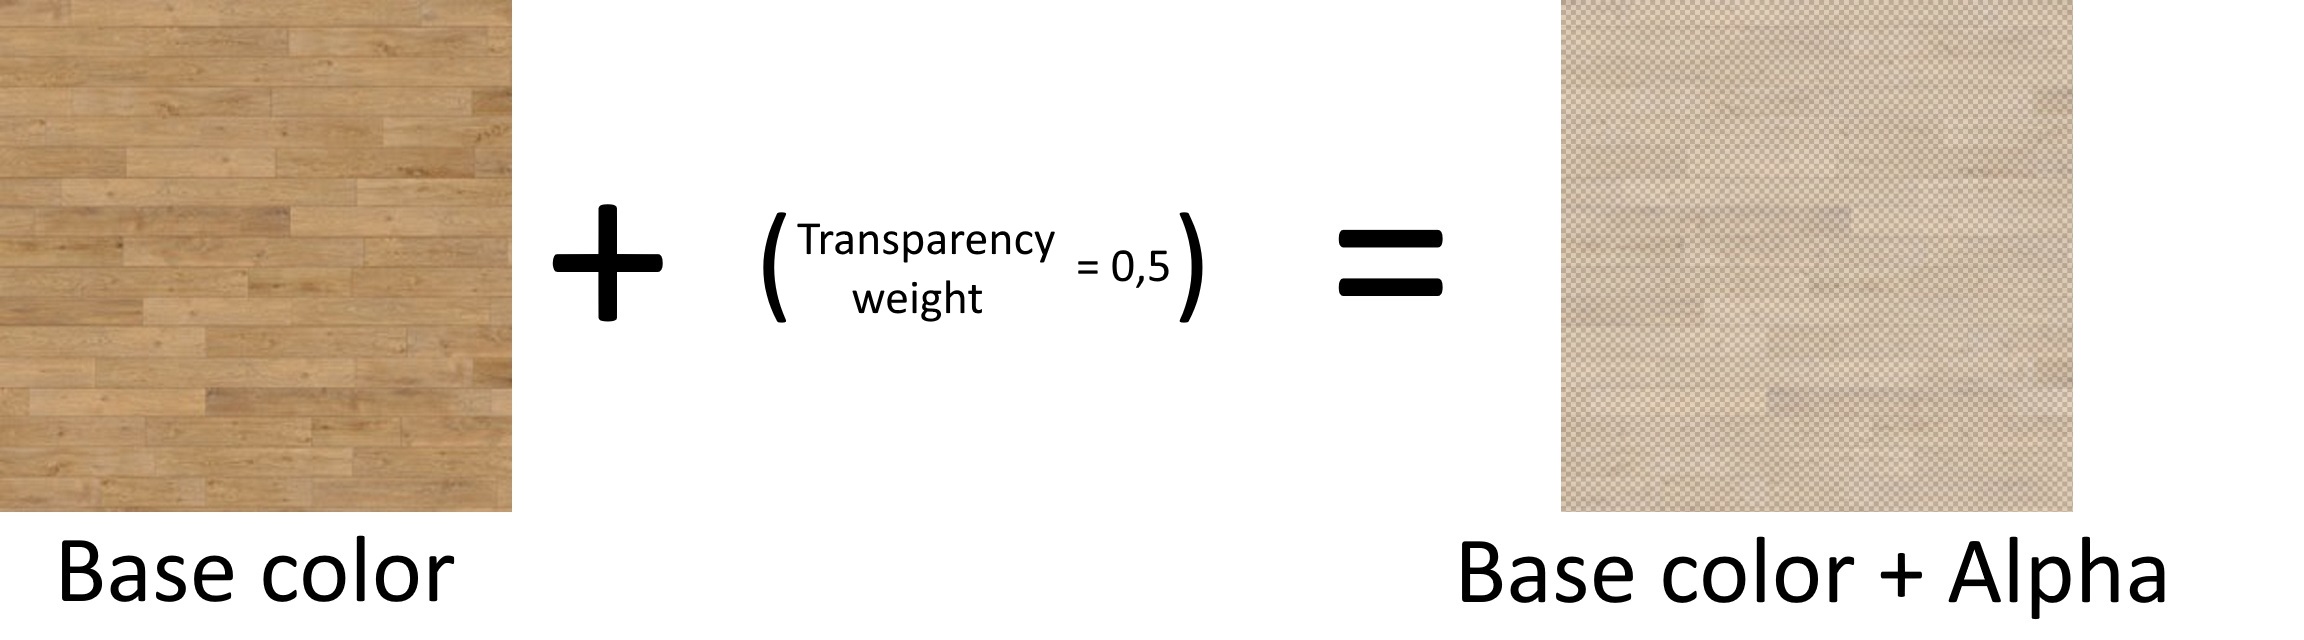
The basic parameter value is used as default value when binded map is not provided:
Metalness and Roughness
The metalness is used.
The roughness of the material is used. It can be inverted to mean Glossiness - this also affects roughness map. The IOR parameter is ignored.
The metalness and roughness maps are combined together:
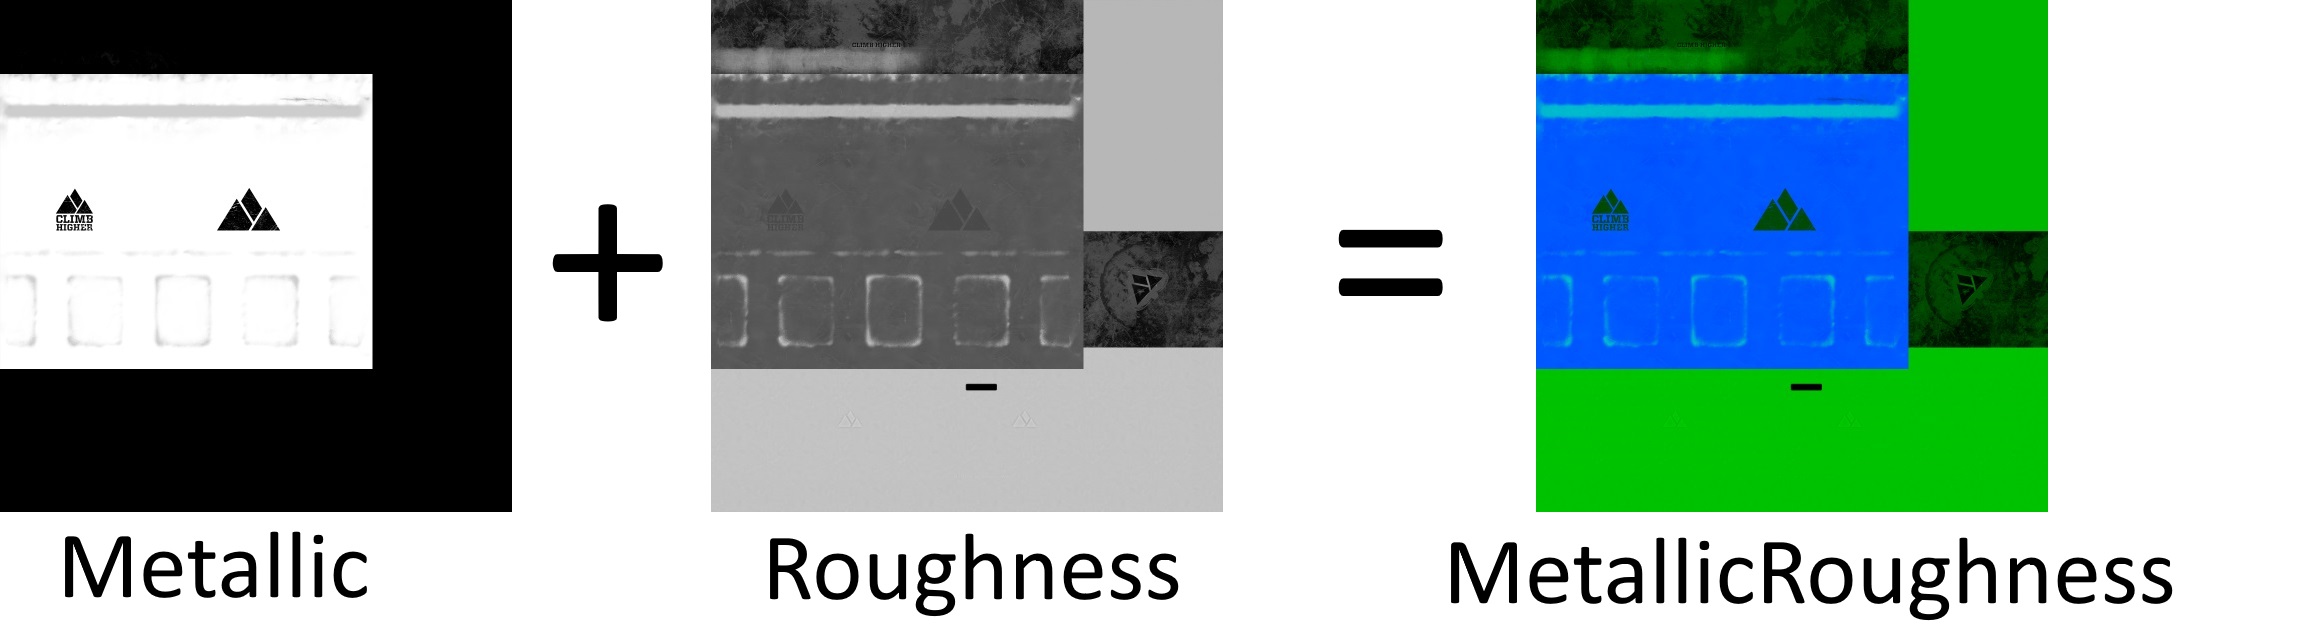
In 3DS MAX, metalness and roughness maps are black and white images (R=G=B).
In glTF format, metalness is stored in blue channel, roughness in green.
The 2 maps must have same sizes to be merged successfully.
Note that the duration of this process scales with images size and may have a severe impact on export duration.
Like for base color and transparency, the basic parameter value is used as default value when binded map is not provided.
Emission
The exported emission color value is computed based on all 4 parameters: emission weight, color, luminance and Kelvin.
However, the exported emission color map is identical to the specified one in generic map. This mean that emisson weight, luminance and Kelvin are not used. The emission map is assumed to be precomputed.
Ambient occlusion
The diffuse roughness map is used as ambient occlusion.
Bump map
The bump map (or normal map) and its weight are used. A tangent-space normal map can be directly connected to the Bump input. Note that glTF does not support height maps. Connecting a height map may yield to unexpected results. Normal Bump map nodes are currently not supported.
Standard Surface Arnold material
The Standard Surface Arnold material is exported to glTF format as a PBR material.
Involved parameters are highlighted bellow.
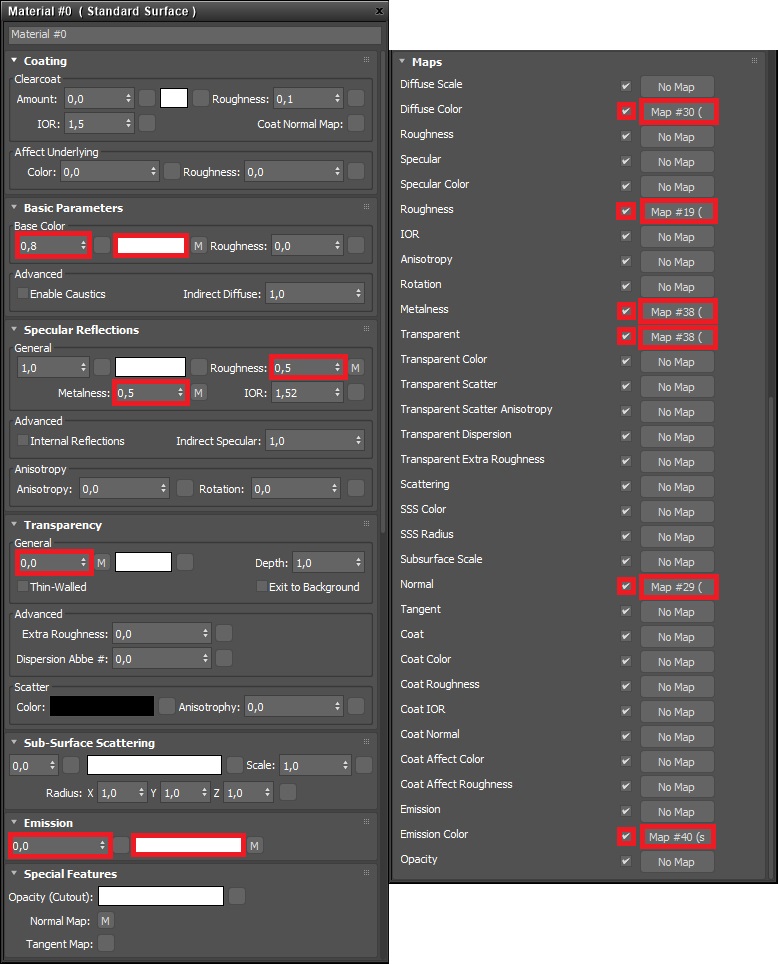
When exporting, if a map is assigned to a parameter, the basic parameter value is ignored.
Base color and Transparency
In the Basic Parameters and Transparency sections, the base color weight, the base color and the transparency weight values are supported. And you can use a map for the base color and the transparency weight (the base color weight map is not supported).
If you use a map for the base color, then the base color weight is overrided to 1 for the export. Also if the base color map and the transparency map are used, they must have the same size in order to be merged successfully.
Note: it is recommended to always set the base color weight to 1.
Metalness, Roughness and Occlusion
In the Specular Reflections section, the metalness and the roughness values and maps are supported. If both maps are used, they must have the same size to be merged successfully.
In 3DS Max, metalness and roughness maps are black and white images (R=G=B). But in glTF format, the metalness is stored in the blue channel and the roughness in the green one (the red channel is for the occlusion). So during the export the metalness and roughness maps are merged in one map using their respective channel.
Metalness and roughness
If you use one of the two maps, then the exporter creates a new map using the provided map and the value of the other parameter.
If you use two different maps, then the exporter merges them in one map.
Metalness, roughness and occlusion all in one map
Alternatively, you can provide a single texture used in both Metalness and Roughness to set an extra attribut: the Ambient Occlusion.
The Ambient Occlusion cannot be set in the Standard Surface material. Thus you cannot take it into account when rendering with Arnold.
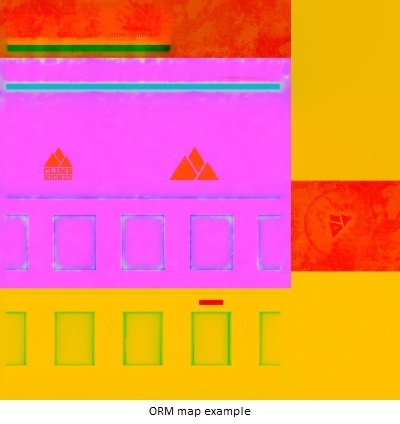
However, such feature is exported and you can hopefully use it in an engine of your choice, provided it does take it into account (Babylon does!). Since there isn't a dedicated channel for Occlusion, the trick is to use a single file for multiple purposes called ORM texture.
Such texture defines:
- the Occlusion in Red channel and is assigned to none of the material attributes
- the Roughness in Green channel and is assigned to the material Roughness
- the Metalness in Blue channel and is assigned to the material Metalness
In this case the exporter does not merge textures, but instead assumes the texture provided is already merged.
You can see how to get a merged ORM texture here.
Emission
In the Emission section, the emission weight and the emission color values are supported. But only the emission color map is supported. If the emission color map is used, then the emission weight and the emission color values are ignored.
Normal
In the Special Features section, only the normal map is supported.
What you should know
Babylon properties
Most babylon properties are not used when exporting to glTF format. The only one which matter is:
- Do not export: Self-explanatory, this object/light/camera won’t be exported. False by default.
Lights
Lights are not supported in glTF 2.0. An empty node is exported in place of light only when it is relevant to do so (when a light has a mesh or a camera as descendant).
There is a glTF lights extension, KHR_lights_punctual that is in the process of ratification, so should be considered experimental. It can be enabled by turning on the KHR_lights_punctual extension checkbox.
Left to right handed coordinate system
As glTF export relies on conversion from babylon, the coordinate system is changing from left (babylon) to right handed (glTF). To do it simply, a root node named "root" is added to the scene. All nodes are set as descendants of this root node. It has specific rotation and scaling to do the trick.
Consideration about skins
In glTF, a skin is binded to a node. The skeleton (root bone) of a skin should be positioned at origin, without rotation or scaling. The node to which is applied the skin is responsible of its transformation (translation, rotation, scale).
Textures image format
glTF 2.0 only supports the following image formats: jpg and png. You are adviced to use those formats for your textures when exporting to glTF.
Note that the exporter also supports textures with bmp, gif, tga, tif and dds formats. But, those textures will be automatically converted to png/jpg by the exporter to follow glTF specifications.
Texture transform
glTF 2.0 supports the KHR_texture_transform extension. When enabled during export, it would be set to required, meaning that the loader is expected to support the extension. Disabling the extension checkbox from the exporter window will export textures without apply the texture transform, which may look visually incorrect when loading into a glTF importer.
Environment texture
To enjoy PBR material rendering, you should have an environmnent texture in your scene. The plugin exports the environment map if any is provided in 3DS MAX.
However, glTF format does not support this feature and the environment map needs to be added manually in client implementations. The Babylon Sandbox, see below, provides such feature.
Double sided material
The handling of the double sided material is mimic from babylon format. Detailed explanations here.
Babylon material attributes
Native materials are enhanced to have extra attributes under Babylon attributes section.

Most Babylon attributes are common to all materials:
- Unlit: A material can be exported as Unlit, meaning independent of lighting. This implies that light-relative attributes or textures are not exported: ambient, specular, emissive, bump mapping and reflection texture. Additionally in gltf, the KHR_materials_unlit extension is added to the material. More details on this extension here. During export, enable the KHR_materials_unlit checkbox.
- Backface Culling: When true, the back faces are not rendered. When false, back faces are rendered using same material as front faces. This property is native to Standard material and is called 2-Sided.
- Opacity/Transparency Mode: You can select how transparency is handled for this material among 3 choices:
- Opaque: The alpha color and texture are ignored during export process.
- Cutoff: The alpha cutoff value is 0.5 (not exported as it is the glTF default value). Alpha values under this threshold are fully transparent. Alpha values above this threshold are fully opaque.
- Blend: This how 3ds Max handles transparency when rendering. This is the default mode for any material with an alpha color or texture.
Custom attributes
Attributes defined by you, the user, are exported as well!
Almost all types of parameters are supported (Float, Color, Boolean...). The only exceptions are Texture, Node and Material types. All nodes (meshes, lights...) and materials have their custom attributes exported.
To define custom attributes either use the Parameter Editor window or scripting:
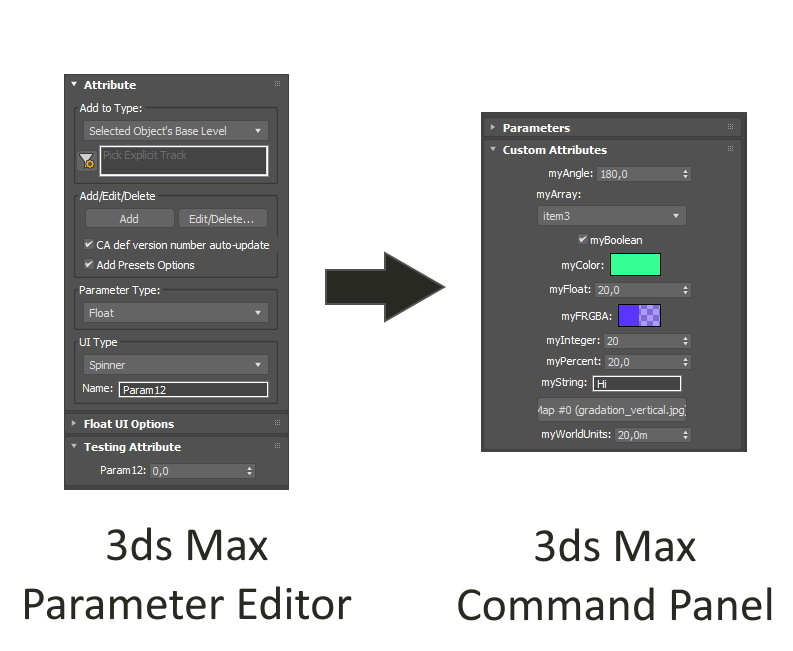
Custom attributes are exported under extras:
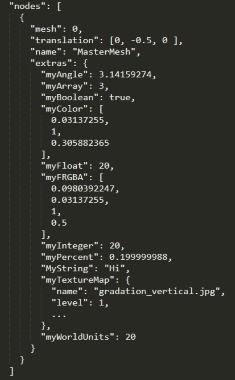
Note that the custom attributes are added to the node, not to the mesh or light component itself.
Following types have particularities you should know:
- Angle : Set in degrees (°) in 3ds Max but exported as radians. Ex: 360° => 3.1416 rads
- Array : An array in 3ds Max is an enumeration of values. Each value has an incremental index, starting from 1. Only one value can be selected. The index of selection is exported, not the displayed value.
- Color and FRGBA : Exported in base 1 as all other colors. Ex: Red (255,0,0) => (1,0,0)
- Percent : Exported in base 1 as well. Ex: 80% => 0.8
- Texture : Not supported. Custom attributes are exported as row values. Thus textures are exported under babylon format instead of glTF format. Bitmaps associated to textures are not exported.
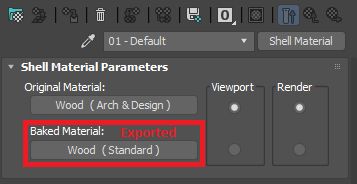
Shell material
In 3DS Max, the Shell material is a container for other materials and controls which material is used in which rendering.
It contains two materials:
- Original Material used for rendering (for example Arnold, Mental ray, V-Ray)
- Baked Material exported by the Babylonjs exporter
DirectX Shader material
In 3DS Max the DirectX shader material is used to represent more accurately how the material will render in another application. That is why only the material contained in its Software Render Style section is exported. All other parameters are ignored.

More information on how you could use this material in conjunction with the Shell material in the discussion here.
Draco compression
On the export form, the Use Draco compression option enables the Draco compression. It needs Node.js and gltf-pipeline in order to work.
To install the Node.js, go to the web site download and install it.
Then to install gltf-pipeline, open et normal shell (cmd.exe or powershell.exe) and run the following command npm install -g gltf-pipeline.
Once they are installed, check the Use Draco compression option and the compression will be automatically done at the export end.
How to export 3D model with animation to .babylon / .gltf format
Single animation clip
You can export all animations of the objects in your scene into a single animation clip following these steps:
-
Open FBX / DAE or any other 3D model with animations in 3ds Max
-
Check / Apply texture to model
-
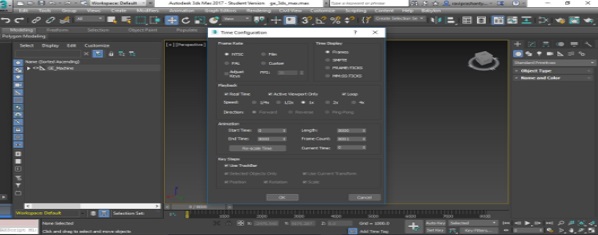
Go to “Time Configuration” window and change “Start Time:”, “End Time” under “Animation” section properly.
- Right click on the imported 3D model. Navigate “Babylon... > Babylon Properties” and open the “Babylon.js Object Properties” window as below.

-
Update the “From:”, “To:” fields under “Animations” section with expected animation frames to be exported
-
Open “Babylon Exporter” window from menu “Babylon > Babylon File Exporter ...” as below.
Multiple animation clips
You can also export multiple animations clips and play one of them depending on the situation. For example, a character would have "Walk", "Run" and "Jump" animations, each spread along the timeline.
To setup the animations clips (also named animation groups) right-click on your scene, you will have a menu Babylon -> Babylon Animation Groups, which opens the Animation Groups window.
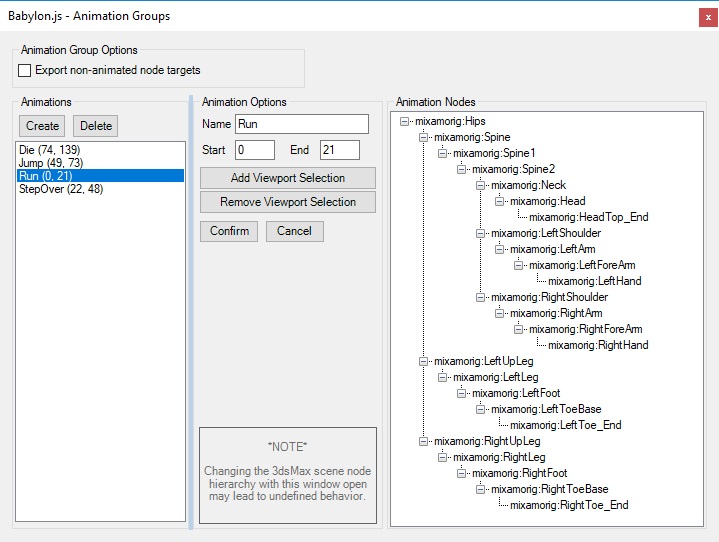
Features are explained below:
-
Create / delete an animation group
-
Set a name
-
Set start and end frames. Values out of timeline bounds are automatically clamped at runtime.
-
Add / remove node selection. This acts as a layer per animation group: only added nodes will be part of the animation group. This is useful when you export a complex scene and want to animate only a small part of it.
-
Export non-animated node targets option: when checked, all added nodes will be part of the animation group. Nodes that are actually not animated (no key in the timeline) will have a fake scale animation exported. This option might be useful if you want to add an in-game behaviour to all the nodes of an animation group, like toggle visibilty.
When updating an input field or the animation nodes, changes are highlighted through a color. Press the Confirm button to submit changes.
Note that when updating the scene hierarchy, like deleting a node, while the Animation Group window is opened, the Animation Nodes frame is not updated. Close the Animation Groups window and re-open it to take hierarchy updates into account.
Try it out!
Export your own scene from 3DS MAX to glTF format and load it into the Babylon Sandbox. Or load them via scripts using the babylon loader.