Export Maya scene as glTF
If you have not already installed the babylon plugin for Maya, you can find all instructions here as well as general information about the plugin.
With this plugin, you can also export your project to glTF 2.0 format (https://github.com/KhronosGroup/glTF/).
All you need to do is choose gltf as Output format.

The plugin exports to babylon format before converting it to glTF. The notable exported files are the .gltf and .bin ones.
To export to a single .glb file, choose glb as Output format.
Features
Exported features
Since the plugin first exports to babylon then converts it to glTF, glTF features are a subset of the babylon ones.
-
Cameras
- zfar
- znear
- yfov (Perspective camera)
- Position / rotation (from nodes)
-
Meshes
- Geometry: position, normal, color, texture coordinates (2 channels)
- Position / rotation / scaling (from nodes)
- Skin
- Instances
- Morph targets
- Animations: bones, morph weights
-
Nodes
- Hierarchy
- Position / rotation / scaling
- Animations: position, rotation, scaling
- Custom attributes
-
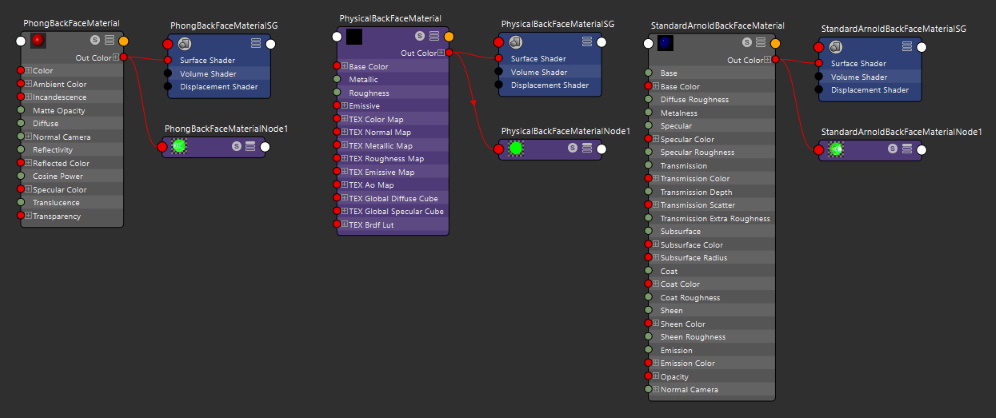
Materials _ Standard materials (Lambert, Phong, PhongE and Blinn are converted to PBR, see below) _ Color * Transparency
- Bump mapping _ Specular color and power _ PBR materials (Stingray PBS, AiStandardSurface) _ Base color & opacity _ Normal _ Metallic _ Roughness _ Emissive _ Multi-materials _ Double sided materials _ Unlit _ Backface culling _ Opacity/Transparency mode * Custom attributes
-
Textures
- Wrap mode (Clamp, mirror, repeat)
- magFilter, minFilter
- Image format conversion to jpg / png
Conversion Standard to PBR materials
Maya Standard materials (Lambert, Phong, PhongE and Blinn) are converted to PBR materials based on their color, specular, transparency and glossiness (specular power).
The complete algorithm is detailed here
Note that the conversion duration scales with images size and may have a severe impact on export duration.
PBR materials
For best results with glTF format, you are adviced to use one of the following materials, as they are the closest ones to glTF PBR material (Physically Based Rendering).
Currently, two PBR materials are exported:
- Stingray PBS: easy to use but Arnold doesn't render this material. Mostly here for legacy usages with elder Maya files.
- AiStandardSurface: Arnold material defining Metalness and Roughness. Not as intuitive as the previous one but this documentation will provide you some useful guidelines.
Stingray PBS
Involved parameters are highlighted bellow and described in the following sections.
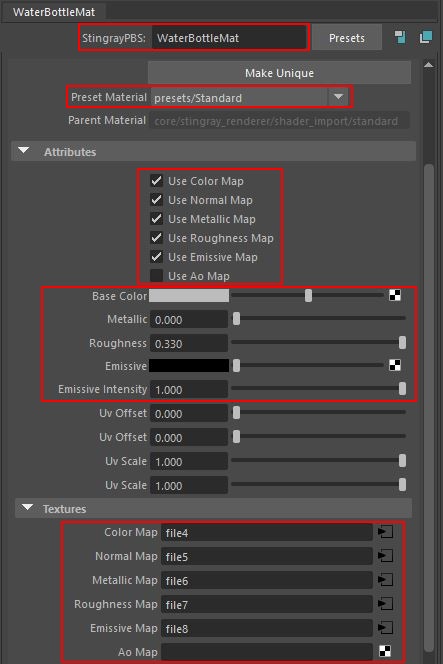
Preset Material
You can choose between presets/Standard and presets/Standard Transparent. The only difference it makes is the presence of an opacity attribute and an opacity map checkbox.
Attributes
The first attributes are checkboxes. When one is checked, the exporter will ignore the linked attribute and will only use the map.
This behaviour is the same for Maya in most cases, see below.
Other attributes (Base Color, Metallic...) are default values used when the corresponding checkboxes are unchecked.
Note that UV attributes are not used by the exporter and should instead be setup in each fileTexture connected to the material.
Textures
When a Use XXXX Map checkbox is checked, the corresponding texture is used instead of the attribute value.
The following maps have dedicated treatment.
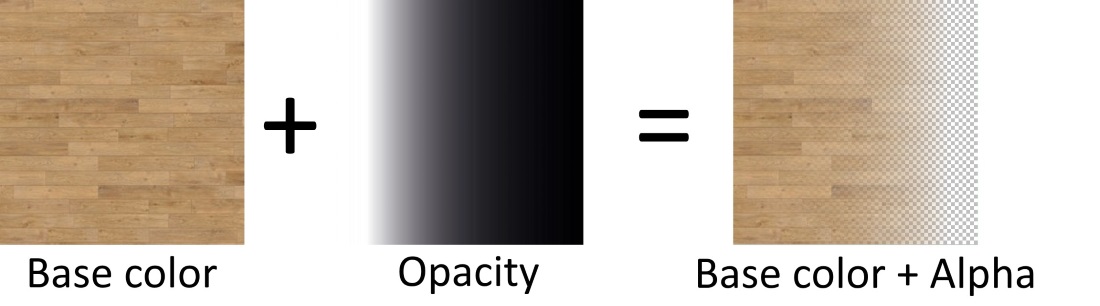
Base color and Opacity as map
When preset material is set to transparent, the texture in Color Map is used both for base color and opacity.
In Maya, if Use Color Map is checked while Use Opacity Map is not, the opacity attribute is used instead of the alpha defined in the texture, and vice versa.
However, the exporter does not follow this behaviour. As long as Use Color Map or Use Opacity Map is checked, both are considered checked. This means that Color Map should contain the end result data (both RGB and Alpha). In this case, the exporter will have no use of the Base Color or Opacity attribute. This also means that opacity must be setup in alpha channel, not in RGB.
When both checkboxes are unchecked, the attributes are used as normal.
Metallic and Roughness
In glTF format, the metallic and roughness maps are combined together:
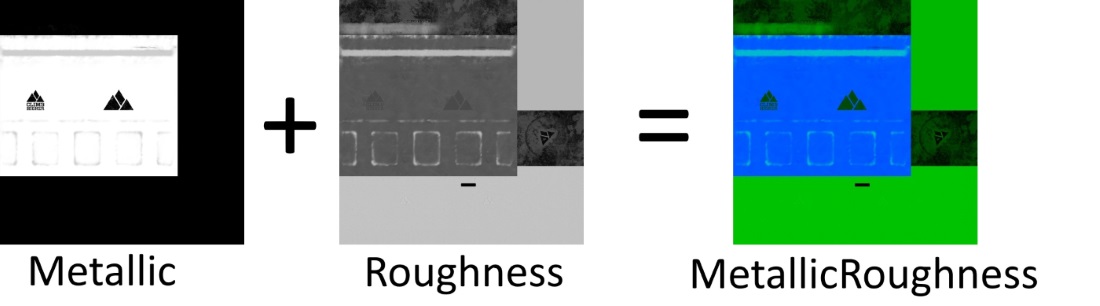
In Maya, metallic and roughness maps are black and white images (R=G=B).
In glTF format, metallic is stored in blue channel, roughness in green.
The 2 maps must have same sizes to be merged successfully. Otherwise, the log panel will display the error "Metallic and roughness maps should have same dimensions" and the merged texture will be irrelevant.
If only one of the 2 maps is used, the attribute value is applied to all pixels when creating merged texture. This behaviour is the same in Maya.
Note that the duration of this process scales with images size and may have a severe impact on export duration.
You can also merge your metallic and roughness maps and use this file for both property in Maya :
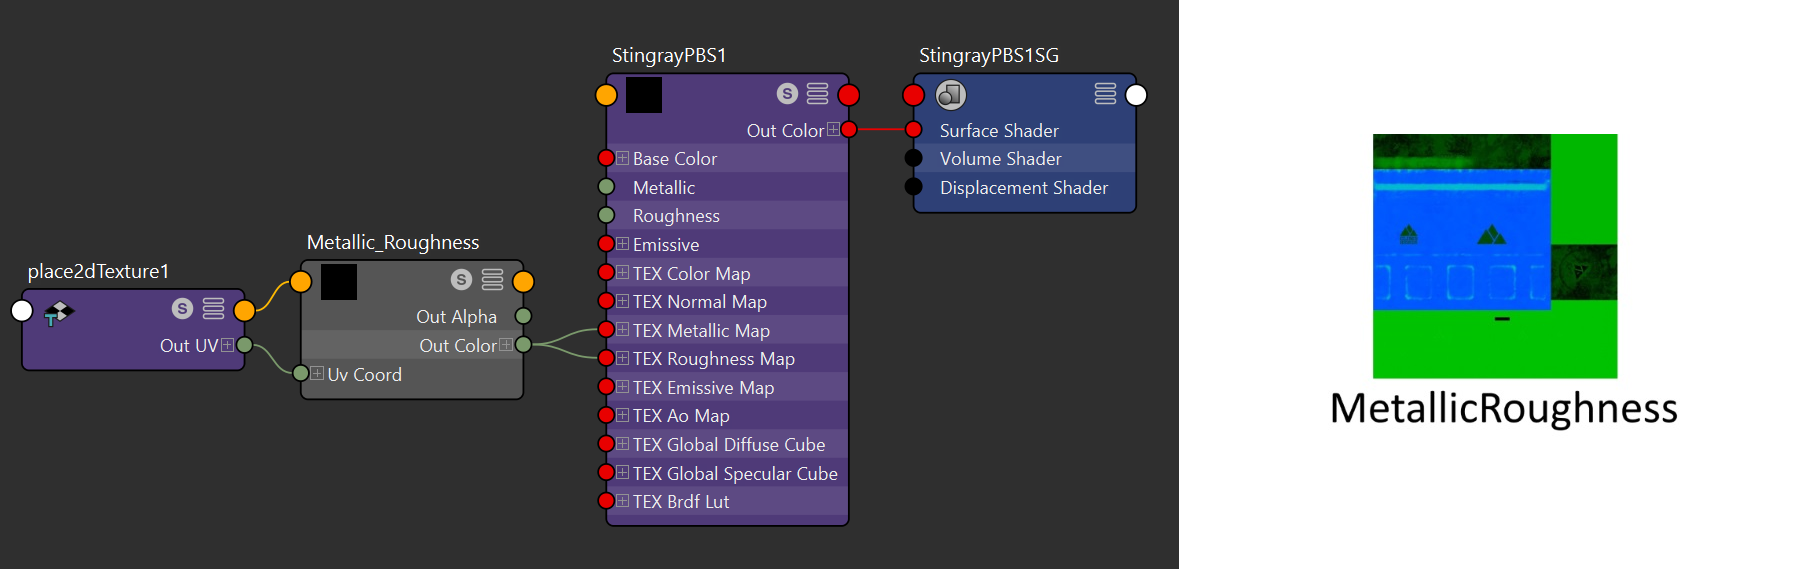
In that way the exporter wont merge the metallic and roughness map and the export duration is going to be faster.
You can see how to get a merged MR texture here.
Metallic, Roughness & Occlusion
As seen before, in glTF format, the metallic and roughness maps are combined together using the blue and green channel.
For the ambient occlusion map, the red channel is going to be used:
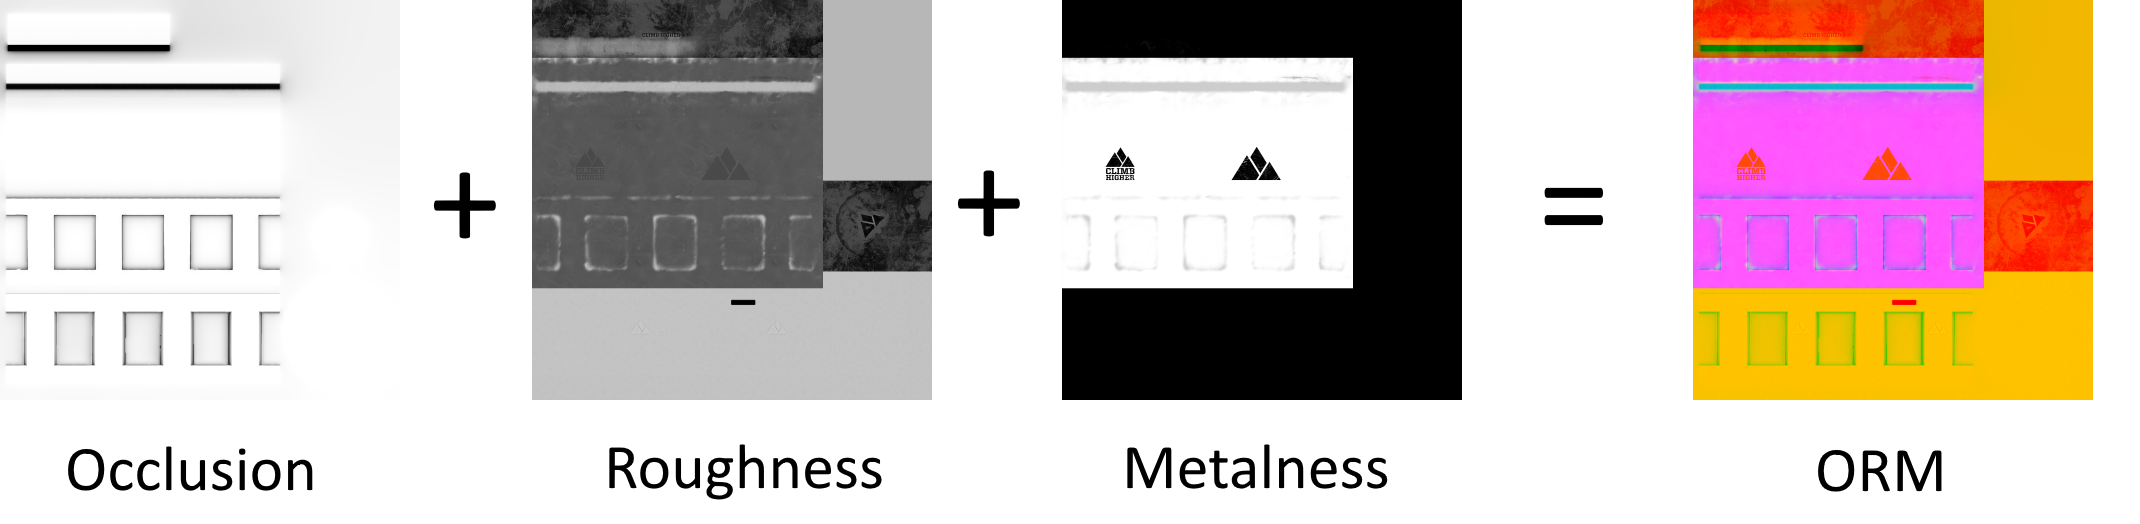
You can merge the metallic, roughness and occlusion maps in order to use only one texture for the three :
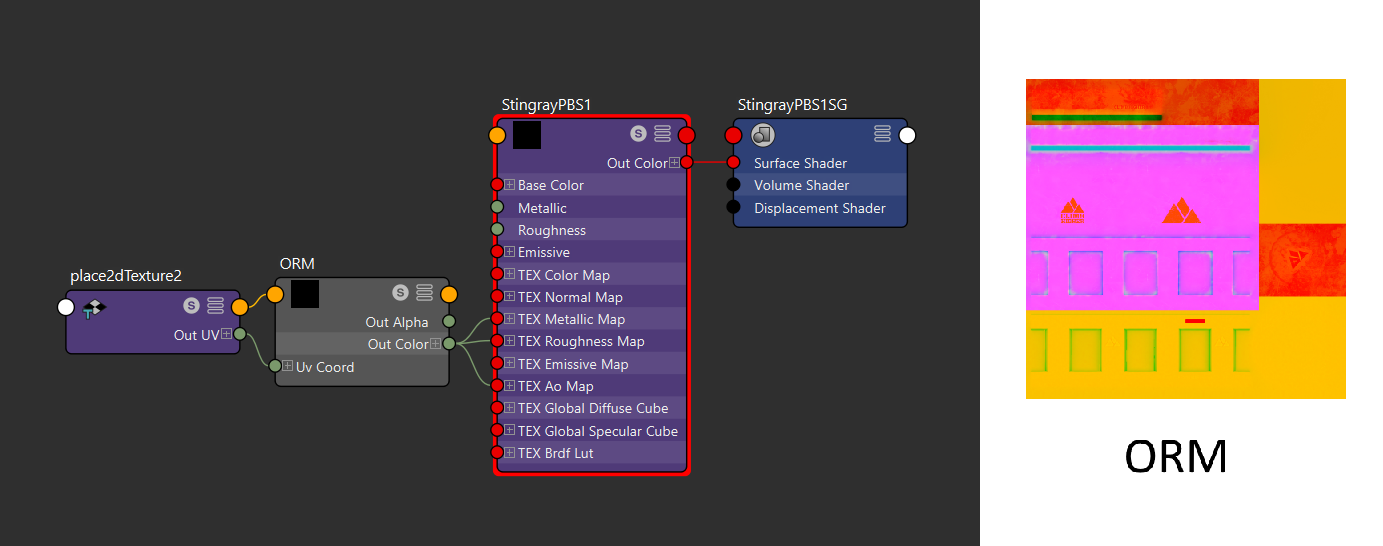
In that way the result is going to be lighter than with an Ambiant Occlusion map and a Metallic Roughness.
You can see how to get a merged ORM texture here.
Emission
If Use Emissive Map attribute is checked, the emissive color and the emissive intensity are ignored by the exporter.
Thus the emissive map is assumed to be already premultiplied by the emissive intensity.
AiStandardSurface
Involved parameters are highlighted bellow and described in the following sections.
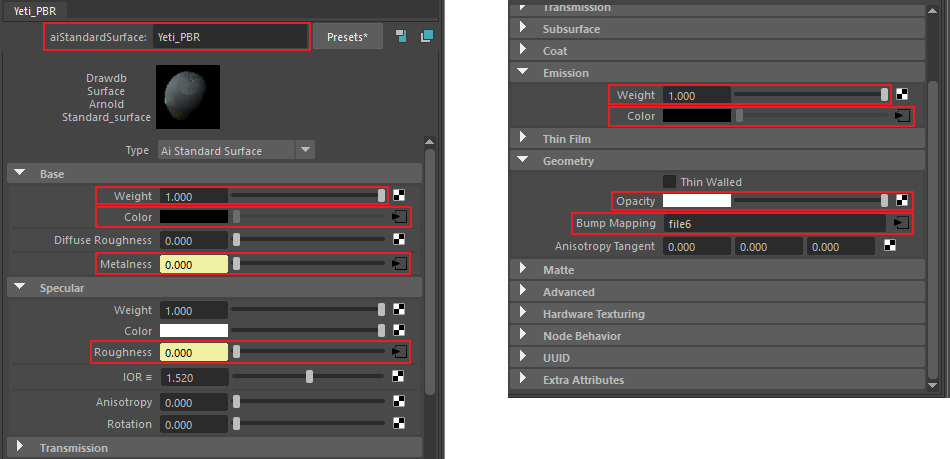
Remember to use Arnold lights when rendering with Arnold or your scene will look black! Physical Sky is a good all corner one if you don't know which one to use.
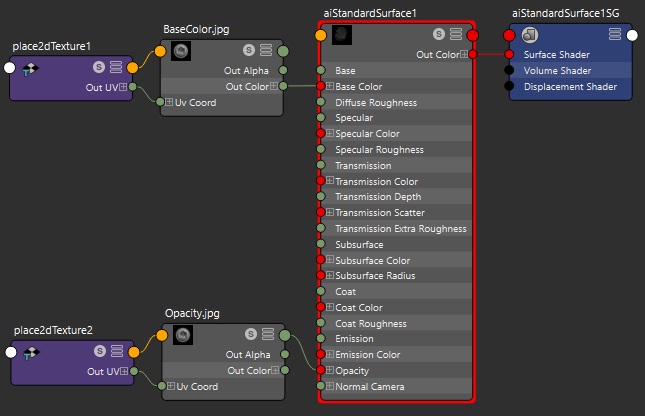
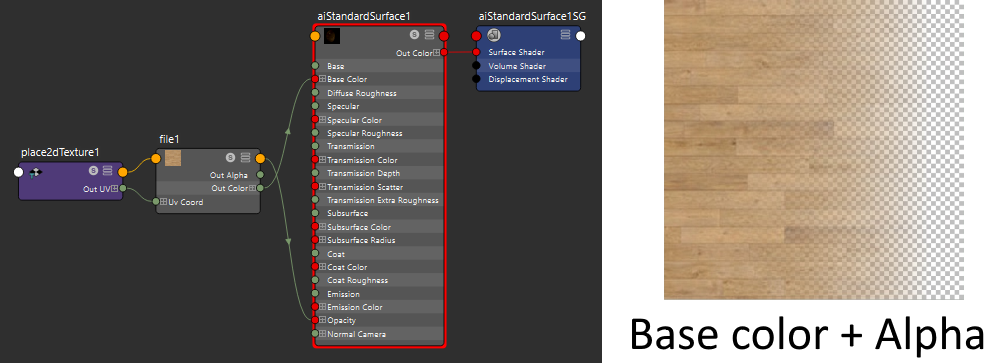
Base color & Opacity
The base color and opacity can be set either by value or using a texture.
You can use 2 different textures (one for base color and one for opacity) or a single texture with merged data. Each method is detailed below.
Note that by default, the Base Weight attribute is set to 0.8. This means that for example a pure white (255, 255, 255) will not appear as white as you would expect (only 204, 204, 204). This attribute is taken into account when exporting, but you should probably set Base Weight value to 1 if you are new to Arnold rendering.
IMPORTANT
In order to make material opacity relevant, you must specify meshes to not be Opaque:
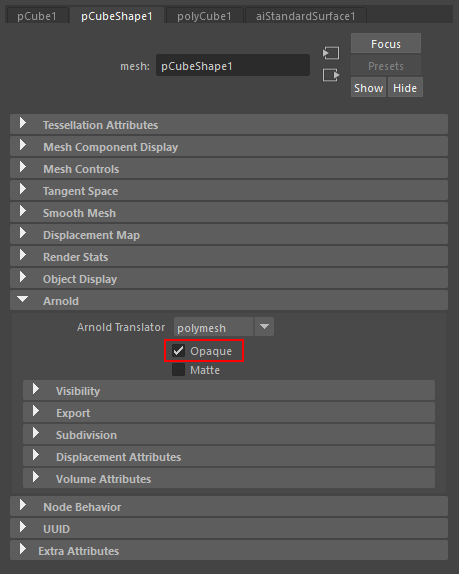
This Arnold attribute must be unchecked for each mesh you wish material opacity to be taken into account.
Babylon and glTF formats don't have such Mesh attribute. When facing a case where a transparent material is assigned to both opaque and non opaque meshes, the exporter get round this missing by duplicating the material. One is assigned to opaque meshes, and all its opacity attributes are erased. The other is assigned to non opaque meshes, and all its opacity attributes remain untouched.
Textures split
You can use 2 different textures, one for Base Color and one for Opacity.
The material Opacity is binded to the file texture Out Transparency.
In glTF format, a single texture is used to describe both parameters. The exporter automatically combines them together:
If a map is not provided, the attribute value is applied to all pixels when creating merged texture.
Note that the 2 maps must have same sizes to be merged successfully. Otherwise, the log panel will display the error "Base color and opacity maps should have same dimensions" and the merged texture will be irrelevant.
Also the duration of this process scales with images size and may have a severe impact on export duration.
Textures already merged
Alternatively, you can provide a single texture used in both Base color and Opacity. In this case, the map is assumed to be already merged.
The material Opacity is binded to the file texture Out Transparency.
Metalness & Roughness
The metalness (or metallic) and specular roughness can be set either by value or using textures.
You can use 2 black and white textures or a single colored texture with merged data. Each method is detailed below.
Metalness & Roughness split
You can use 2 different textures, one for Metalness and one for Specular Roughness. Those maps are black and white images (R=G=B).
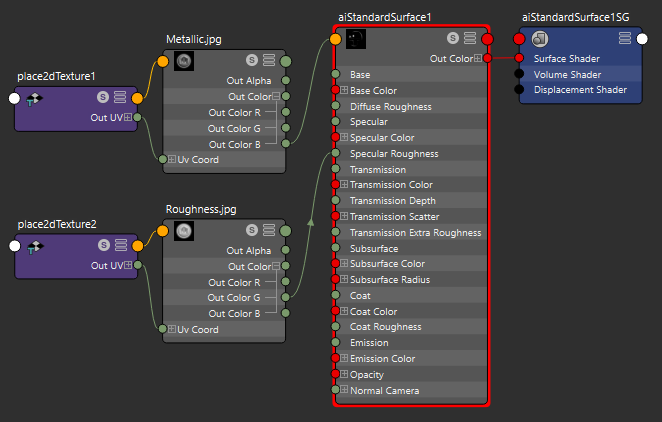
Note that when setting a map by clicking on the icon next to Metalness or Specular Roughness attribute in the material editor window, the default file texture channel is Out Alpha. You may need to remove the link and instead use one of the Out Color channel. Even though any Out Color channel would be correct as they are all the equal, you are advised as a good practice to use the blue one for Metalness and the green one for Specular Roughness.

In glTF format, a single texture is used to describe both parameters: metallic is stored in blue channel, roughness in green. The exporter automatically combines metalness and roughness maps together:
If a map is not provided, the attribute value is applied to all pixels when creating merged texture.
Note that the 2 maps must have same sizes to be merged successfully. Otherwise, the log panel will display the error "Metallic and roughness maps should have same dimensions" and the merged texture will be irrelevant.
Also the duration of this process scales with images size and may have a severe impact on export duration.
Metalness, Roughness & Occlusion all together
Alternatively, you can provide a single texture used in both Metalness and Specular Roughness. This texture actually holds a sneaky extra attribute...Ambient Occlusion!
The Ambient Occlusion cannot be set in AiStandardSurface material. Thus you cannot take it into account when rendering with Arnold.
However, such feature is exported and you can hopefully use it in an engine of your choice, provided it does take it into account (Babylon does!). Since there isn't a dedicated channel for Occlusion, the trick is to use a single file for multiple purposes called ORM texture.
Such texture defines:
- the Occlusion in Red channel and is assigned to none of the material attributes
- the Roughness in Green channel and is assigned to the material Specular Roughness
- the Metalness in Blue channel and is assigned to the material Metalness
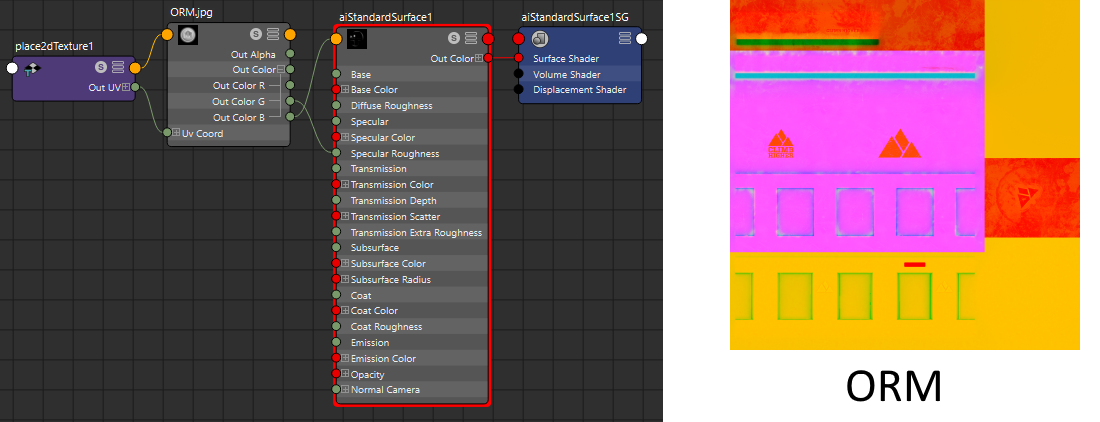
The exporter does not merge textures for you, but instead assumes the texture provided is already merged.
You can see how to get a merged ORM texture here.
Emission
The emission color can be set either by value or using a texture.
IMPORTANT
In order to make material emission relevant, you must specify a value for material Emission Weight. This attribute is taken into account when exporting, but you should probably set Emission Weight value to 1 if you are new to Arnold rendering.
Bump Mapping
The bump mapping (or normal camera) can only be set using a texture.
What you should know
Lights
Lights are not supported in glTF 2.0. An empty node is exported in place of light only when it is relevant to do so (when a light has a mesh or a camera as descendant).
Textures image format
glTF 2.0 only supports the following image formats: jpg and png. You are adviced to use those formats for your textures when exporting to glTF.
Note that the exporter also supports textures with bmp, gif, tga, tif and dds formats. But, those textures will be automatically converted to png/jpg by the exporter to follow glTF specifications.
Environment texture
To enjoy PBR material rendering, you should have an environmnent texture in your scene. Currently the plugin does not export any environment map and one must be added manually in client implementations. The Babylon Sandbox provides such feature.
Get a merged occlusion/roughness/metallic texture
To obtain such texture, either:
- create the image manually, using 1 channel from each of the 3 images, with a software like Photoshop.
- export the textures from a 3D painting software using ORM configuration. From Substance Painter:
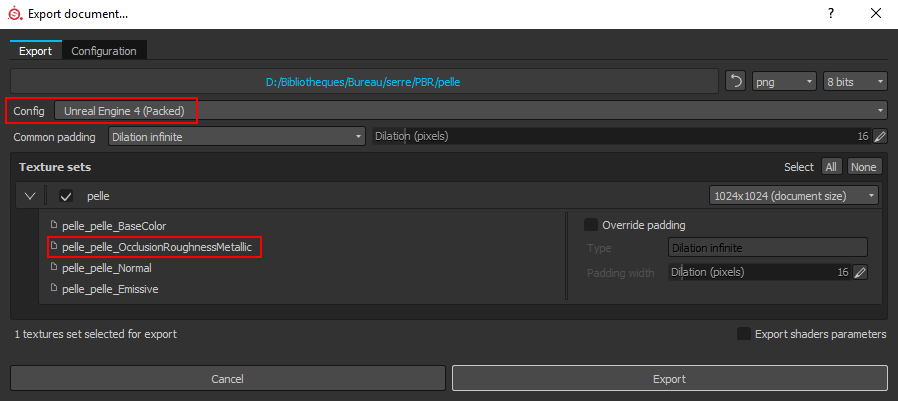
Using Unreal Engine 4 (Packed) configuration, the occlusion, roughness and metallic are combined together into a single ORM texture.
Draco compression
On the export form, the Use Draco compression option enables the Draco compression. It needs Node.js and gltf-pipeline in order to work.
To install the Node.js, go to the web site download and install it.
Then to install gltf-pipeline, open et normal shell (cmd.exe or powershell.exe) and run the following command npm install -g gltf-pipeline.
Once they are installed, check the Use Draco compression option and the compression will be automatically done at the export end.
Double sided material
The handling of the double sided material is mimic from babylon format. Detailed explanations here.
Babylon material attributes
Native materials are enhanced to have extra attributes in a dedicated node. A Babylon attribute node is created after the first export using the material.
Here is an example for 3 different materials:
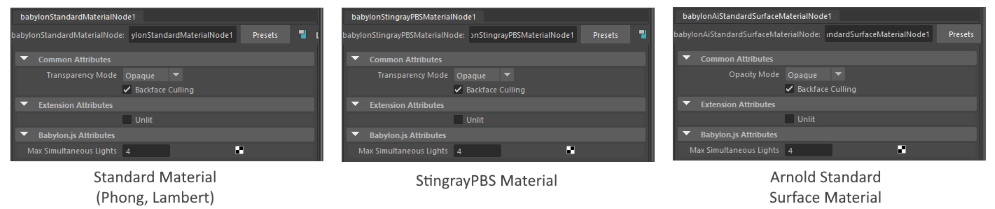
Most Babylon attributes are common to all materials:
- Unlit: A material can be exported as Unlit, meaning independent of lighting. This implies that light-relative attributes or textures are not exported: ambient, specular, emissive, bump mapping and reflection texture. Additionally in gltf, the KHR_materials_unlit extension is added to the material. More details on this extension here. During export, enable the KHR_materials_unlit checkbox.
- Backface Culling: When true, the back faces are not rendered. When false, back faces are rendered using same material as front faces.
- Opacity/Transparency Mode: You can select how transparency is handled for this material among 3 choices:
- Opaque: The alpha color and texture are ignored during export process.
- Cutoff: The alpha cutoff value is 0.5. Alpha values under this threshold are fully transparent. Alpha values above this threshold are fully opaque.
- Blend: This how Maya handles transparency when rendering. This is the default mode for any material with an alpha color or texture.
Custom attributes
You can add custom attributes to Meshes, Materials, Lights and Cameras with the attributes window (Modify > Add Attribute...) and it adds them in the extra attributes of those objects.
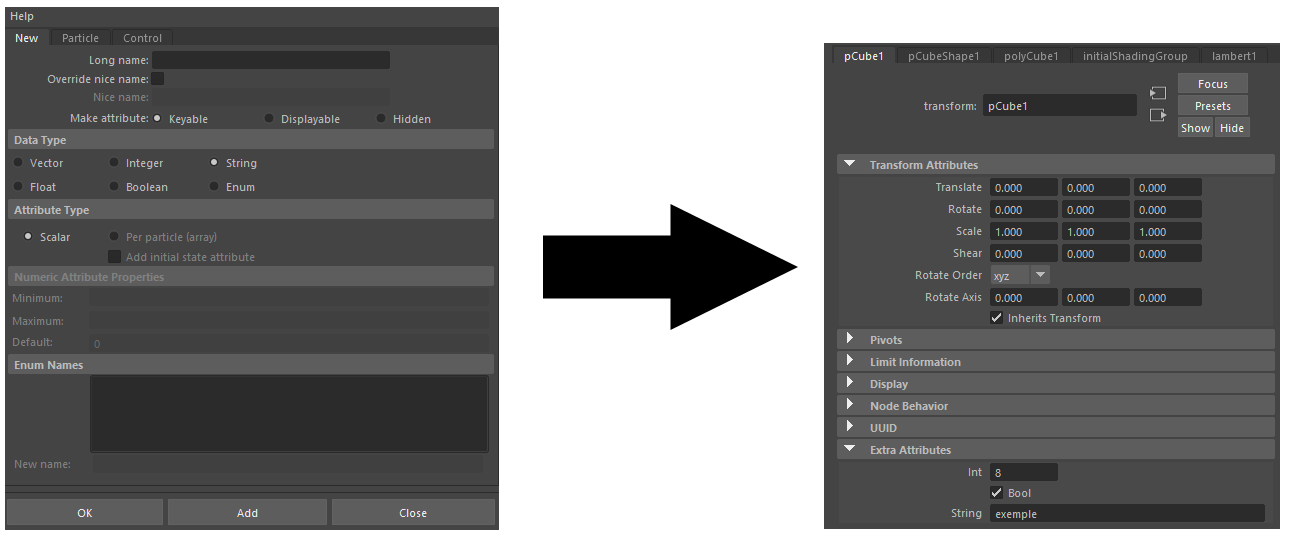
In glTF, the custom attributes are added as extras.
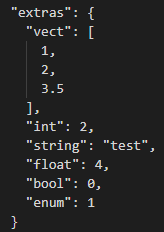
Note that the custom attributes are added to the node, not to the mesh or light component itself.
Following types have particularities you should know:
- bool : is equal to 0 or 1.
- enum : corresponds to the index of your Maya enum.
How to export multiple animation clips to .gltf format
You can export multiple animations clips and play one of them depending on the situation. For example, a character would have "Walk", "Run" and "Jump" animations, each spread along the timeline.
To setup the animations clips (also named animation groups) click on the Babylon tab on the top menu, and click on Animation groups.
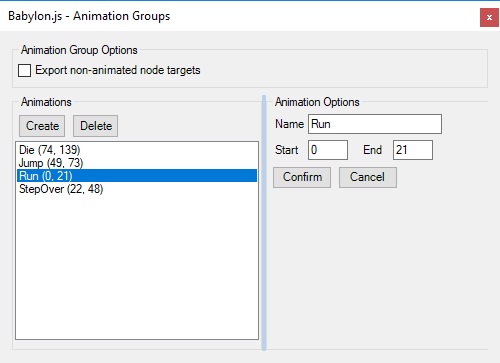
Features are explained below:
-
Create / delete an animation group
-
Set a name
-
Set start and end frames. Values out of timeline bounds are automatically clamped at runtime.
-
Export non-animated node targets option: when checked, nodes that are actually not animated (no key in the timeline) will have a fake scale animation exported. This option might be useful if you want to add an in-game behaviour to all the nodes of an animation group, like toggle visibilty.
When updating an input field, changes are highlighted in red. Press the Confirm button to submit changes.
Try it out
Export your own scene from Maya to glTF format and load it into the Babylon Sandbox. Or load them via scripts using the Babylon loader.