Install the Maya Plugin
Installer
Installing the installer (so meta...)
We have recently introduced a new tool to simplify the installation of the plugin for both Max and Maya.
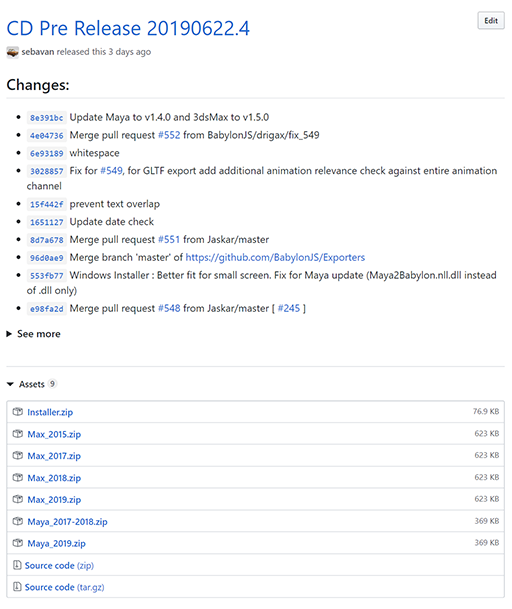
First, you can download the latest version of the installer from our Github Releases. Once on the releases page, you can find all our packages in the assets section of each releases:
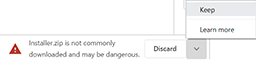
From there, you can download the Installer.zip file. Chrome is currently warning of potential threat as the installer.exe has currently not been downloaded enough to pass the Chromium checks. In this case, you might see a message like this:

You can nervertheless continue to download by pressing the little arrow and chosing to "Keep" the file:
Once downloaded, you can extract the content of the zip in your favorite location.
Using the installer
Launch the executable file contained in the previous zip. On the first launch Windows like Chrome previously will emit a Smart Screen warning as the application has currently not being launched enough to be trusted.
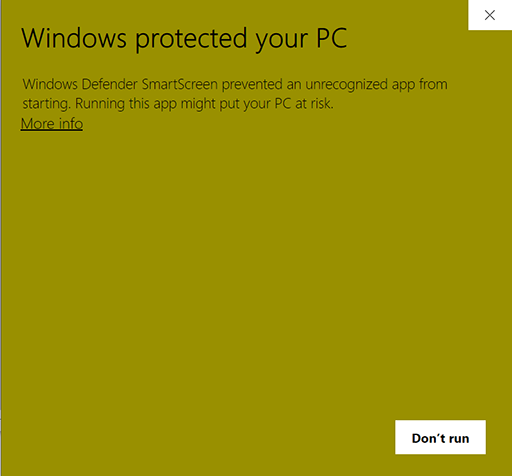
As before, you can chose to continue by pressing more info and then Run anyway:
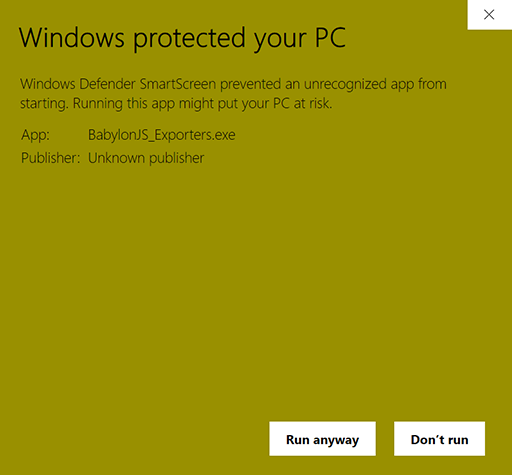
No worries, you are almost there. A second warning is raised by Windows as the installer needs to write files in the program files and therefore run in elevated mode. You can access the User Account Control and finally start using the application.
From this point, it gets simpler:
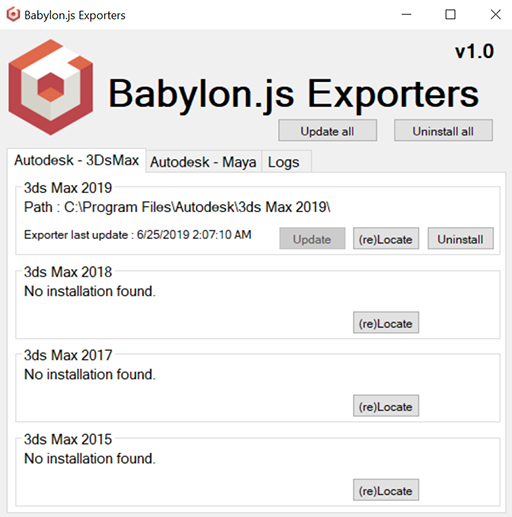
Once launched the application should auto detect all the installation folders from your Autodesk applications. In case it fails to do so, you could still manually location the targetted software.
You can now easily install or update any of your 3d authoring tools to the latest prerelease available on Github.
Would you want to upgrade to the latest available pre-release of the exporter plugins, you can easily launch back the installer and follow the same exact procedure to update the installed plugins to their latest versions.
Please not that both the software you are trying to install the plugin for should be closed during the installation.
Manual Install
The plug-in is designed for Maya 2017 or later. This guide is about the Windows version (a MacOS version is coming soon). To download it, go to the Github project Releases.
In the assets section of the release you can find one zip file per supported tool (like Maya_2019.zip) containing the plugin files.
Click on the zip file, to start Downloading.
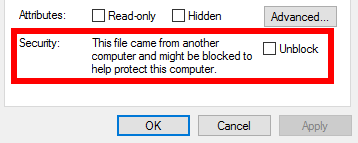
By default, Windows blocks all .dll files coming from the web, so we have to unblock them first. Select the zip file, and with a right click select Properties, select Unblock, and then OK.
Then, extract the content of the zip file on your computer.
Finally:
- move all .dll files into a directory defined in Maya plug-in path (for example
C:/Program Files/Autodesk/Maya2018/bin/plug-ins). More information on how to install a plug-in in Maya here. - and move all template files to their respective folders AETemplates and NETemplates. Those files are used for the UI. While not mandatory they are always welcomed!
You should find the Maya2Babylon.nll.dll in the plug-in Manager (Windows > Settings/Preferences > Plug-in Manager).
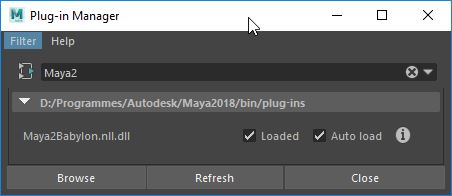
Check Loaded and Auto load, and a new tab should appear:

Congratulations! You did it!
Dependencies
Visual Studio
Visual Studio is required to build the Maya2Babylon project from source.
.NET Framework
The .NET Framework Redistributable needs to be installed in order to run the Maya2Babylon plugin properly.
-
Maya2Babylon 2017-2018
- Requires atleast .NET Framework 4.6.1
-
Maya2Babylon 2019
- Requires atleast .NET Framework 4.6.1
-
Maya2Babylon 2020
- Requires atleast .NET Framework 4.6.1
Other Dependencies
- For Maya 2020
- Maya2Babylon 2020 requires Maya 2020.1 or newer.
Features
Exported features
-
Meshes * Visibility * Position / rotation / scaling * Geometry (position, normal, tangent, texture coordinates (2 channels))
- Skin _ Instances _ Morph targets (blend shapes) _ Animations: Position, scaling, rotation, bones, morph weights _ Custom attributes
-
Materials
-
Standard materials (Lambert, Phong, PhongE and Blinn) - Color - Transparency
-
Ambient color _ Bump mapping _ Specular color and power _ Reflected color _ PBR materials (Stingray PBS, AiStandardSurface) _ Base color & opacity _ Normal _ Metallic _ Roughness _ Emissive _ Multi-materials _ Double sided materials _ Unlit _ Backface culling _ Max Simultaneous Lights _ Opacity/Transparency mode _ Custom attributes
-
-
Textures
- UV offset / scaling / angle
- Level
- Coordinates mode (spherical, planar, explicit)
- Wrapping (clamp, mirror, wrap)
-
Cameras * Fov * MinZ * MaxZ * Position * Target / Rotation
- Animations: Position, Target / Rotation * Custom attributes
-
Lights * Point / spot / directional / ambient
- Inclusion / exclusion lists * Position / direction * Intensity * Diffuse * Specular _ Animations: Position, direction _ Custom attributes
The exporter window
When your scene is ready to be exported, click on the Babylon tab on the top menu, and click on Babylon File Exporter to display the exporter window.
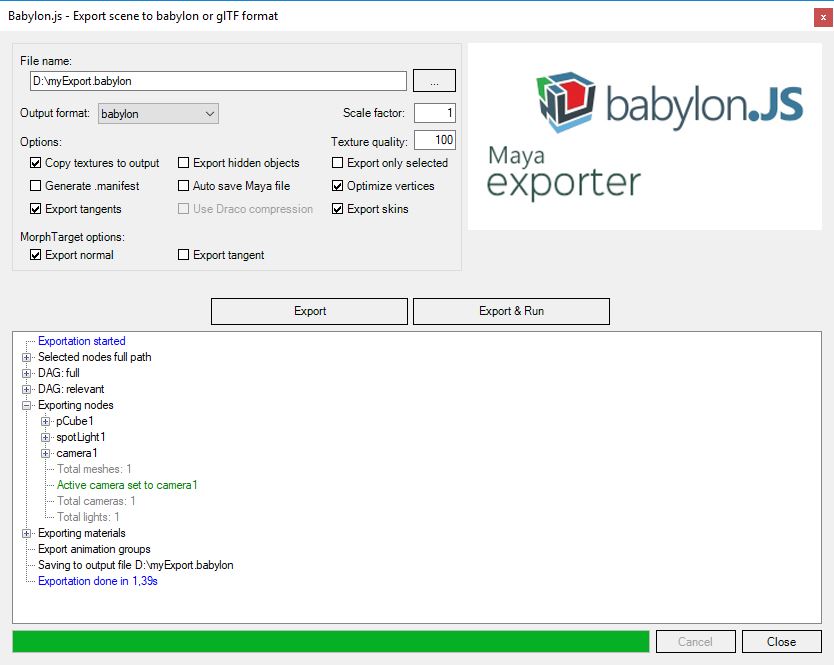
This window is composed of 3 panels:
- A top panel with a file path and a button. With this panel, you choose where your Babylon file will be exported by clicking on the right button
- Several options and two buttons Export and Export & Run
- A log panel
The Export button should be used to create the Babylon file representing your scene. The Export & Run button will also create the Babylon file, but will also launch your default browser and run the newly made Babylon file. This button is very useful if you just want to test the render of your scene in Babylon.js.
As babylon.js script is retrieved directly from the official website directly, you should have internet access in order to correctly use Export & Run.
The log panel indicates in real time which mesh has been exported, which material, and if there are any problems with these objects.
Option Optimize vertices: The Babylon exporter will try to optimize the number of vertices to export instead of exporting everything naively (if a vertex is part of two faces, this vertex won’t be exported twice with this option checked).
The Scale factor can be used to rescale the whole world. If you set a scale factor equal to 100, the resulting scene will be 100 times smaller (1%). By default the scale factor is equal to 1, meaning no rescale.
The Texture quality sets the convertion quality of bitmap to JPEG. At 100 (the maximum value), it gives the highest image quality but no file size reduction. On the contrary at 0 (the minimum value), it gives the lowest image quality but the greatest file size reduction. By default the Texture quality is set to 100.
The Use Draco comression option is only available for gltf and glb output format. More detail here.
In the MorphTarget options section, the Export normal and Export tangent checkboxes allow you to customize the morph target export.
What you should know
Camera
If you want to test your scene right away by using the button Export & Run, your scene should have a camera created. Otherwise, the log panel will display the warning “No camera defined” and a default one would be created at runtime but won't be exported in .babylon file.
If you have more than one camera, the first one will be set as activeCamera in Babylon.
Light
If you don’t have any lights in your scene, the exporter will add an ambient light by default. The log panel will display the warning “No light defined – A default ambient light was added for your convenience”.
Locator
If you want to have a point in space used only for its transform attributes you can use a Locator. For example, a target camera naturally comes with a locator to indicate the position to look at. They can also be used as parent node when updating the scene at runtime with the Babylon engine.
Group node
A group node is exported as a dummy, a mesh without vertices, just like a locator. However, only group nodes used as parent for other nodes are exported. If you have an empty group node, you should probably switch to a locator instead or it will be ignored.
Textures and intermediate nodes
Maya provides a large range of tools to manipulate connexions between textures and materials (like the Reverse node). For the most part, only a fileTexture is expected as input to a material.
Currently the following intermediate nodes are supported by the exporter:
- Projection node which is only considered for the reflected color texture of a standard material. You can choose the projection type between Spherical or Planar. If no projection node is provided, the default projection type is Spherical for the reflected color texture.
- Bump2d node which is automatically created when assigning a file to a bump attribute.
Textures image format
Babylon engine fully supports the following image formats: jpg, bmp, png, gif, tga. You are adviced to use those formats for your textures when exporting to Babylon.
Note that the exporter also supports textures with tif and dds formats. But, those textures will be automatically converted to png by the exporter to ensure compatibility with the Babylon engine.
Physical materials
The handling of physical materials is mimic from glTF format. Detailed explanations here
As well as the default supported GLTF parameters, in Babylon format, we support the coating parameters of Arnold Standard Surface. You can see below the supported parameters:
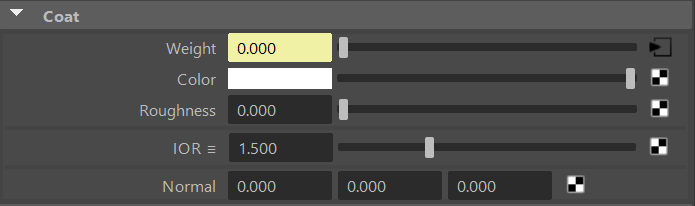
Please note that if a map is used for the weight or the roughness parameter, they will be combined in the same way the ORM texture is created in the Detailed explanations. In Maya, metalness and roughness maps are black and white images (R=G=B). The 2 maps must have same sizes to be merged successfully.
In Babylon format, weight is stored in red channel, roughness in green.
UV sets
Babylon engine supports only 2 UV sets. In Maya the first UV set, created by default (map1), is used as UV1 in Babylon. The second UV set (map2) is used as UV2. Other UV sets are ignored and UV2 is used instead.
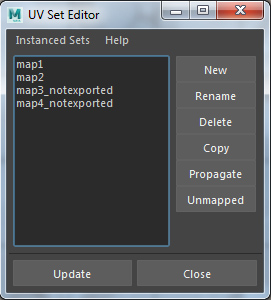
Moreover, Babylon engine supports only 1 UV set per texture. If a single texture is linked to UV1 and any other UV set, the log panel will display the warning “Texture is linked to UV1 and UV2. Only one UV set per texture is supported.” and the texture will be linked to UV1 or UV2 but not both.
Now that you know all about the exporter features, it’s time to use it!
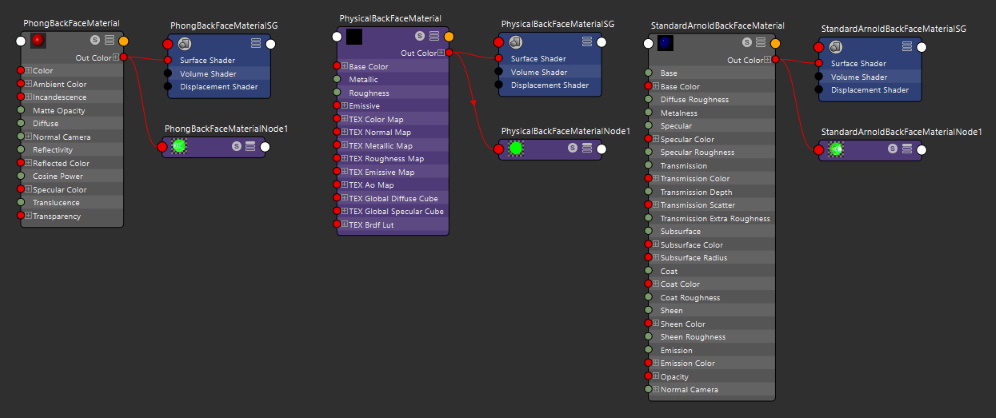
Double sided material
To create a double sided material there are different methods, but the only one exported is using two materials and a condition.

When exporting, the geometry of all meshes using a double sided material is duplicated:
- the number of vertices and faces is doubled
- faces, normals and tangents are inverted for the duplicated geometry
This mean that the exporter is automatically creating a back side. If you already have a back side, you should directly apply a material to it.
Babylon material attributes
Native materials are enhanced to have extra attributes in a dedicated node. A Babylon attribute node is created after the first export using the material.
Here is an example for 3 different materials:
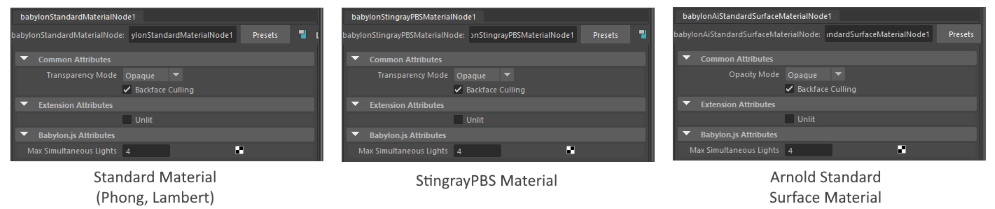
Most Babylon attributes are common to all materials:
- Unlit: A material can be exported as Unlit, meaning independent of lighting. This implies that light-relative attributes or textures are not exported: ambient, specular, emissive, bump mapping and reflection texture.
- Backface Culling: When true, the back faces are not rendered. When false, back faces are rendered using same material as front faces.
- Max Simultaneous Lights: Number of Simultaneous lights allowed on the material.
- Opacity/Transparency Mode: You can select how transparency is handled for this material among 3 choices:
- Opaque: The alpha color and texture are ignored during export process.
- Cutoff: The alpha cutoff value is 0.5. Alpha values under this threshold are fully transparent. Alpha values above this threshold are fully opaque.
- Blend: This how Maya handles transparency when rendering. This is the default mode for any material with an alpha color or texture.
Custom attributes
You can add custom attributes to Meshes, Materials, Lights and Cameras with the attributes window (Modify > Add Attribute...) and it adds them in the extra attributes of those objects.
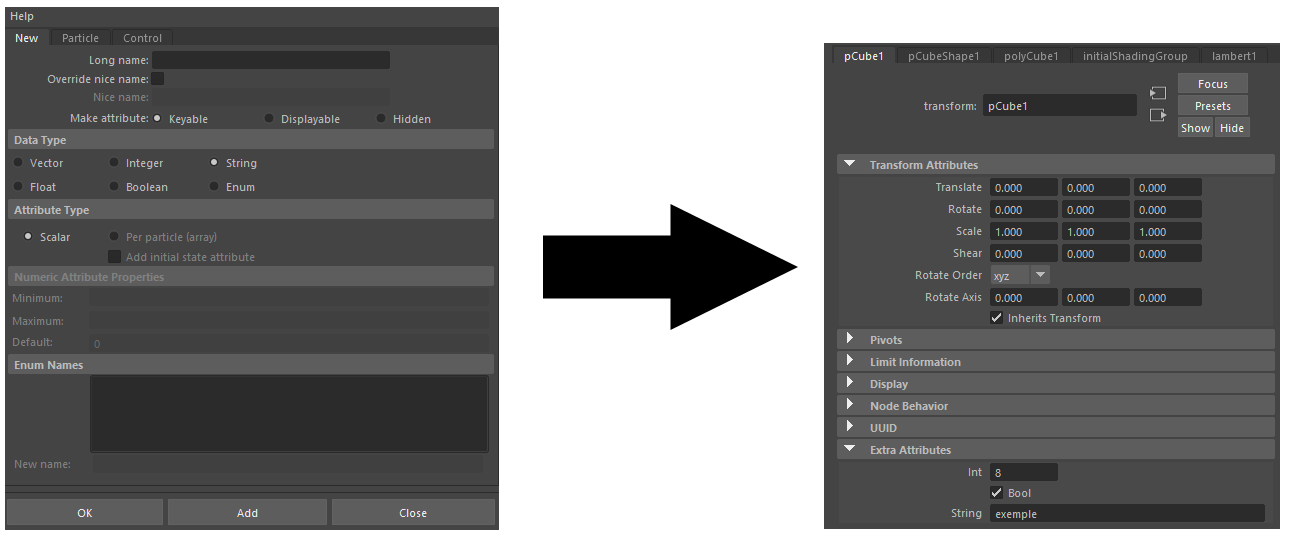
In babylon, the custom attributes are added as metadata.
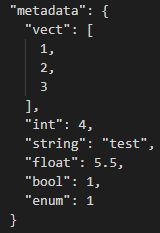
Following types have particularities you should know:
- bool : is equal to 0 or 1.
- enum : corresponds to the index of your Maya enum.
Exporter through MEL script
You can use the exporter through MEL script. To do so you need to generate the exporter parameters with the command 'GenerateExportersParameter' and specify a path and the export type.

Then you need to specify the other parameters and export with the command 'ScriptToBabylon'.

You can find an example script in the Maya\MELScripts folder of the exporter.
Using the exporter
Export your own scene from Maya to babylon format and load it into the Babylon Sandbox. Or load them via scripts using the babylon loader.